Ensuring the quality and reliability of coated screws is paramount across various industries and applications. Coating not only enhances their appearance but also shields against corrosion, bolstering durability. To guarantee adherence to desired standards, rigorous inspection methods are indispensable. Here's a detailed exploration of these methods:
Cosmetic Inspection:
A visual assessment ensures even coating distribution without irregularities like bubbles or discoloration. This sustains aesthetic appeal and assures consistent quality.
Coating Thickness Inspection:
Measuring Tool Method: Utilizes precision tools like micrometers to gauge coating thickness.
Magnetic Method: Employs magnetic induction to measure non-magnetic coating thickness on ferrous substrates.
Microscopy: Examines screws under a microscope for precise measurement, especially useful for thin coatings.
Chronometric Flow Method: Utilizes a stopwatch to measure coating material flow time, correlating with thickness.

Adhesion Strength Inspection:
Friction Polishing Test: Subjects screws to friction against a hard surface to assess resistance to coating removal.
File Method Test: Uses a file to scrape coating surface, evaluating resistance to removal.
Scratch Method: Involves making a scratch to assess detachment; minimal or no detachment indicates strong adhesion.
Bending Test: Evaluates flexibility and adhesion by controlled bending; intact coating signifies good adhesion.
Thermal Shock Test: Exposes screws to rapid temperature changes to assess adhesion; minimal coating damage indicates strong adhesion.
Squeeze Method: Applies pressure to assess adhesion; intact coating under pressure indicates good adhesion.
Corrosion Resistance Inspection:
Atmospheric Explosion Test: Exposes screws to corrosive atmosphere to simulate real-world conditions.
Neutral Salt Spray Test (NSS Test): Evaluates corrosion resistance by exposing screws to salt spray environment.
Acetate Spray Test (ASS Test) and Copper Accelerated Acetate Spray Test (CASS Test): Assess corrosion resistance under rigorous conditions.
Corrosion Paste Corrosion Test (CORR Test) and Solution Droplet Corrosion Test: Directly apply corrosive substances to assess corrosion.
Immersion Test, Inter-Immersion Corrosion Test, etc.: Immerse screws in corrosive solutions to simulate various environments.
In conclusion, these inspection methods ensure quality, reliability, and performance of coated screws. Establishing partnerships with reputable manufacturers is crucial. Through meticulous research, evaluation of track records, consideration of quality assurance, and assessing customer support, businesses can forge successful collaborations meeting industry demands.
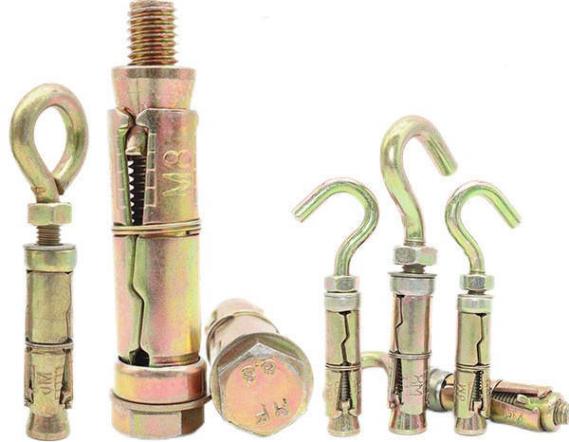
Rivet nuts, also referred to as threaded inserts or blind rivet nuts, are invaluable fasteners utilized for establishing robust and dependable threads in materials where traditional threading techniques prove impractical. Whether initiating or dismantling rivet nuts, mastering the proper methodologies and precautions is paramount for achieving favorable results. This guide will comprehensively explore the procedures for installing and uninstalling rivet nuts, equipping you with the knowledge needed to proficiently execute these tasks.

Installing Rivet Nuts
Necessary Tools and Materials:
Before commencing the installation process, ensure you have the essential tools and materials readily available, including a drill, an appropriate rivet nut installation tool (such as a hand or power tool), drill bits of suitable sizes, and the rivet nuts themselves.
Pre-Installation Preparations:
To facilitate a seamless installation process, undertake the following preparatory measures:
Selecting the rivet nut with the right size and type: Factor in the material thickness, load requirements, and thread size to select the suitable rivet nut.
Marking the Installation Spot: Accurately mark the intended installation location to ensure precise placement.
Installation Steps:
Follow these steps for successful rivet nut installation:
Drilling a Hole in the Base Material: Utilize a drill with a bit slightly smaller than the outer diameter of the rivet nut to create a hole in the base material.
Inserting the Rivet Nut into the Hole: Ensure the rivet nut is inserted into the drilled hole, positioned flush with the material surface.
Applying Pressure to Expand the Rivet Nut: Utilize the appropriate installation tool to exert pressure, causing the rivet nut to expand and securely grip the surrounding material.
Verifying Proper Installation: Confirm that the rivet nut is firmly in place and capable of accommodating the intended fastener.

Uninstalling Rivet Nuts
Necessary Tools and Materials:
Before proceeding with rivet nut removal, gather the following tools and materials: a rivet nut removal tool (such as a mandrel and nosepiece set), pliers or wrenches, and safety gear.
Pre-Uninstallation Preparations:
Before initiating the removal process, undertake the following preparatory steps:
Identifying the Rivet Nut Type and Size: Determine the specific type and size of the rivet nut to select the appropriate removal tool and technique.
Inspecting Surrounding Components: Assess the surrounding components to ensure they remain undamaged during the uninstallation process.
Uninstallation Steps:
Follow these steps to remove a rivet nut:
Removing Connected Fasteners: If any fasteners are threaded into the rivet nut, remove them using pliers or wrenches.
Applying Reverse Force: Utilize the rivet nut removal tool to apply reverse force, breaking the nut’s grip on the base material.
Extracting the Rivet Nut: Once the grip is loosened, gently extract the rivet nut from the hole using pliers or the removal tool.
Post-Uninstallation Considerations:
After removing the rivet nut, address the following considerations:
Inspecting the Hole for Damage: Assess the hole to ensure it remains intact and free from any damage incurred during the removal process.
Repairing or Replacing the Hole: If necessary, repair the damaged hole using appropriate methods or consider replacing the entire component.
Common Challenges and Tips
Overcoming Resistance: If encountering resistance during either process, apply gentle pressure and ensure correct tool usage to avoid damage.
Dealing with Damaged Rivet Nuts: In cases of damage, consider specialized extraction tools or techniques for removal and explore alternatives for reinstallation.
Ensuring Proper Alignment and Torque: Ensure proper alignment and torque application during installation to prevent thread deformation or failure.
Using Lubricants or Adhesives: Lubricants or adhesives may aid in smoother installation or removal processes by reducing friction or enhancing stability.
Safety Considerations:
Wear appropriate personal protective equipment to mitigate potential injuries from flying debris or accidental slips.
Exercise caution during drilling and force application to prevent injuries or damage.
Take precautions to avoid damage to surrounding components or structures during installation or removal.
Conclusion:
Proficiency in rivet nut installation and removal is essential for various applications. By adhering to the outlined procedures, considering provided tips, and prioritizing safety measures, you can achieve successful outcomes while ensuring safety and efficiency. With this comprehensive guide, you are equipped to undertake rivet nut projects confidently, ensuring reliable and durable fastenings or removals.
Selecting the appropriate screws for metal studs is paramount for ensuring structural integrity, longevity, and safety in construction projects. Unlike wood studs, metal studs demand specialized screws tailored to provide maximum strength and stability. This article delves into the types of screws commonly used for metal studs and offers comprehensive guidance on choosing the right screws for various applications.

Importance of Choosing the Right Screws for Metal Studs:
Structural Integrity:
Utilizing the correct screws is crucial for maintaining the structural integrity of metal stud frameworks. Properly fastened studs ensure sturdy connections, safeguarding the overall stability and safety of the structure.
Load-Bearing Capacity:
Metal studs often bear significant loads, such as drywall or fixtures. The right screws offer the necessary strength and gripping force to support these loads, preventing sagging, shifting, or collapse.
Prevention of Damage:
Using screws designed for wood on metal studs can cause damage such as thread peeling, hole widening, or stud deformation. Choosing the wrong screws jeopardizes stud integrity and may necessitate costly repairs or replacements.
Compatibility:
Metal studs come in various gauges, thicknesses, and materials. Using screws specifically designed for metal studs ensures a proper fit and secure attachment, avoiding issues related to size or material incompatibility.
Time and Cost Efficiency:
Selecting the right screws saves time and money in the long run. Properly chosen screws are easier to install, require fewer reworks or repairs, and provide a reliable fastening system, eliminating the need for future adjustments or replacements.
Commonly Used Screws for Metal Studs:
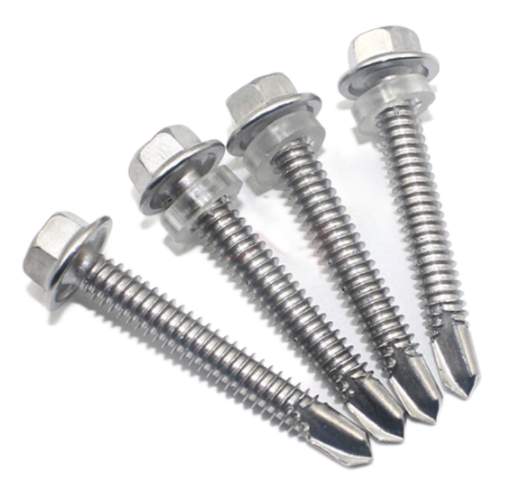
Self-Drilling Screws:
Equipped with a drill bit at the tip, self-drilling screws create their own pilot holes as they are driven into metal. These hardened steel screws with sharp tips are ideal for connecting metal studs or attaching materials like drywall or sheathing.
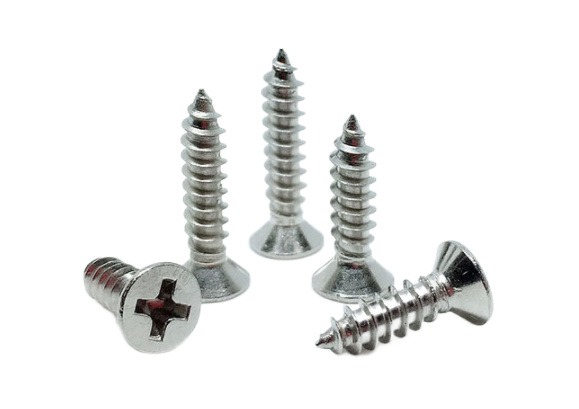
Self-Tapping Screws:
Similar to self-drilling screws, socket self-tapping screws have a sharp point but require a pre-drilled pilot hole. Widely used for connecting accessories, brackets, or fixtures to metal studs, they can form their own threads when driven into metal.
Fine-Thread Screws:
Fine-thread screws feature tightly spaced threads that offer excellent holding power, especially in thinner gauge metal studs. They distribute the load evenly, reducing the risk of stud breakage or screw stripping, and are available in various lengths and thread patterns.
Coarse-Thread Screws:
Designed for heavy-duty applications and larger metal studs, coarse-thread screws have wider-spaced threads that provide enhanced grip and resistance to pull-out. They are suitable for high-strength operations like connecting large fixtures or equipment to metal studs.
Factors to Consider for Choosing the Right Screws for Metal Studs:
Corrosion Resistance:
Opt for screws made of corrosion-resistant materials like stainless steel or coated screws to prevent rusting, especially in environments prone to moisture or other corrosive elements.
Screw Length and Diameter:
Ensure the screw length is sufficient to penetrate the metal stud and secure the material without protruding excessively. Match the screw diameter to the size of the pre-drilled hole or the self-drilling capacity of the screw for proper installation.
Conclusion:
Choosing the appropriate screws for metal studs is paramount for ensuring the strength, stability, and longevity of construction or remodeling projects. By selecting screws that offer secure fastening, corrosion resistance, and compatibility with metal stud requirements, you can save time, money, and ensure the long-term success of any building endeavor.
Anchor bolts are indispensable fasteners used to secure items to concrete, masonry, or other structural materials, ensuring structural integrity and safety in various construction, engineering, and industrial applications. In this article, we'll delve into the essential steps of anchor bolt installation, focusing on pre-installation preparation, drilling, placement, and securing.
Pre-Installation Preparation:
Before installing anchor bolts, several preparatory steps are crucial:
Determine Anchor Bolt Requirements: Consult building plans or engineering drawings to identify the type and size of anchor bolts needed, considering load capacity, environmental factors, and material compatibility.
Select Materials and Equipment: Choose anchor bolts made of suitable materials like carbon steel, stainless steel, or galvanized steel, ensuring adequate strength and corrosion resistance. Gather essential tools and equipment, including drills, torque wrenches, washers, nuts, and safety gear.
Review Construction Plans: Familiarize yourself with construction plans or specifications detailing anchor bolt placement and installation requirements, ensuring compliance with design criteria.
Marking and Layout: Accurately mark anchor bolt positions on the construction site using precise measurements and layout tools. Pay attention to specified hole sizes, depths, and spacing.
Obtain Approvals and Safety Gear: Obtain necessary approvals or permits before installation and ensure compliance with safety regulations. Wear appropriate personal protective equipment (PPE) such as safety glasses, gloves, and hard hats.
Drilling Process:
Drilling precise holes is crucial for proper anchor bolt installation:
Gather Equipment: Assemble drilling equipment including drills, appropriate drill bits, and safety gear.
Select Drill Bit: Choose a drill bit matching the diameter and type of anchor bolts. Ensure it's designed for drilling into concrete or masonry.
Prepare Drill and Mark Depth: Secure the drill bit in the chuck and set the drill to the correct mode. Mark the desired drilling depth on the bit using tape or a permanent marker.

Safety Precautions: Wear PPE and use dust masks or respirators to protect against airborne particles.
Start Drilling: Drill perpendicular to the surface at marked anchor bolt positions, applying consistent pressure and speed. Clear debris periodically and monitor drilling depth.
Repeat for Additional Holes: Repeat the drilling process for each anchor bolt location, ensuring uniform depth and precision.
Placements During Installation:
Proper placement ensures accurate alignment and stability:
Prepare Anchor Bolts: Ensure anchor bolts are clean and free of debris, removing any protective caps or coatings.
Insert Anchor Bolts: Carefully insert each anchor bolt into its corresponding drilled hole, applying downward pressure for secure placement.
Verify Alignment: Check bolt alignment and use a level or plumb line for vertical positioning. Readjust if necessary to ensure proper alignment and depth.
Clean Surrounding Area: Remove debris around anchor bolts for a secure fit, ensuring no obstructions hinder installation.
Securing the Anchor Bolts:
Securely fasten anchor bolts to ensure stability and load-bearing capacity:
Place Washers and Nuts: Position washers on anchor bolts and hand-tighten nuts, ensuring proper alignment.
Use Torque Wrench: Use a torque wrench to tighten nuts to the specified torque value, gradually increasing torque in a cross-pattern tightening sequence.
Recheck Alignment: Double-check bolt alignment after tightening to confirm proper placement and make adjustments if needed.
Final Torque Check: Perform a final torque check to ensure uniform tightening and secure attachment. Trim excess bolt length if necessary.
By following these essential procedures, you can ensure successful anchor bolt installation, contributing to structural stability, safety, and durability for your project.
Galvanized bolts are widely used for their rust and corrosion-resistant properties, achieved through zinc coating. However, despite this protection, galvanized bolts can still rust under certain conditions. This article delves into the factors contributing to the rusting of galvanized bolts and provides solutions to mitigate these issues.
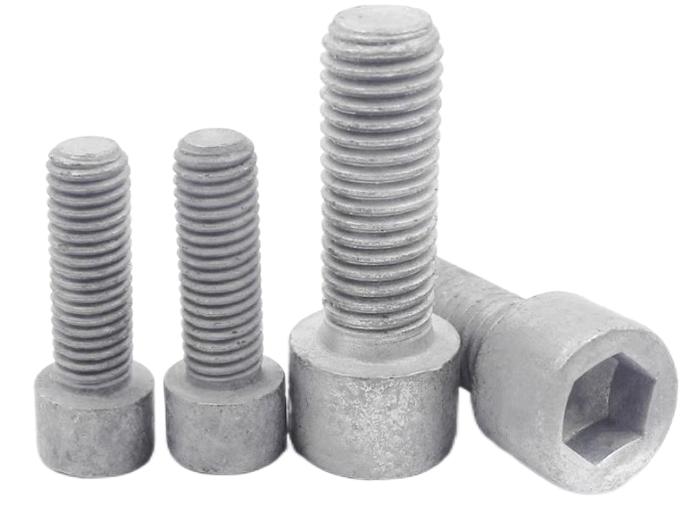
What are Galvanized Bolts?
Galvanized bolts are steel bolts coated with zinc to form a protective layer against rust and corrosion. The zinc coating acts as a sacrificial barrier, corroding before the underlying steel, thus shielding it from environmental elements like moisture and oxygen.
Factors Causing Rusting of Galvanized Bolts:
Damage to the Zinc Coating:
Damage to the zinc coating, such as scratches or chips, exposes the steel to moisture and oxygen, facilitating rust formation. Mishandling during installation, shipping, or storage, along with contact with abrasive surfaces, can compromise the integrity of the zinc coating.
Solution: Handle galvanized bolts with care, avoiding impacts and storing them in dry, well-ventilated areas away from corrosive substances. Repair or replace bolts with damaged coatings promptly.
Exposure to Harsh Environments:
Prolonged exposure to corrosive environments, such as marine or industrial settings, accelerates zinc coating breakdown. High salt content in seawater or pollutants in industrial areas can dissolve zinc coatings, leaving the steel vulnerable to rust.
Solution: Select galvanized coatings tailored to specific environments and conduct regular inspections for damage. Implement maintenance measures like cleaning or recoating to prevent rust formation.
Dissimilar Metal Contact:
When hot dip galvanized bolts come into contact with dissimilar metals, it can induce electrochemical reactions that degrade the zinc coating. This occurs due to variations in electrode potentials between metals.
Solution: Use insulating materials to prevent direct contact between galvanized bolts and dissimilar metals, minimizing galvanic corrosion.
Improper Installation:
Incorrect installation practices, such as overtightening bolts or trapping moisture between mating surfaces, can damage zinc coatings and create conditions conducive to rusting.
Solution: Follow manufacturer's installation guidelines and torque specifications, avoiding over-tightening. Ensure mating surfaces are clean and dry before installation.
Chloride Contamination:
Chloride pollutants, found in saltwater and deicing salts, accelerate zinc coating corrosion. Chloride ions penetrate the zinc layer, reaching the steel surface and initiating rust formation.
Solution: Use galvanized bolts with thicker zinc coatings or additional protective coatings designed for chloride-rich environments. Regular maintenance and inspection are essential to detect and address corrosion promptly.
Summary:
While galvanized bolts offer corrosion resistance, various factors can lead to rusting. Awareness of these conditions and implementing preventive measures are crucial for maintaining the integrity and longevity of galvanized bolt installations.