Ensuring the security of fasteners is crucial in various industries to prevent failures and accidents. Bolt locking methods encompass friction, mechanical, and permanent techniques. Permanent locking methods like welding and riveting are irreversible and unsuitable for reuse. Friction methods involve elements like washers and self-locking nuts. In this article, we'll delve into 8 effective methods for preventing bolt loosening.
Double Nut Technique:
The double nut method creates two friction surfaces during locking: one between the nut and the fastener, and another between the nuts. The initial preload on the first surface is 80% of the second. Under impact and vibration, the first surface's friction decreases while compressing the first nut increases the second surface's friction. This dual friction mechanism resists loosening effectively.
Self-Locking Nuts:
Self-locking nuts rely on friction to prevent loosening. High-strength variants suit heavy-duty equipment, while Nylock nuts find use in aerospace and machinery.

Wedge Nord Lock Washer:
With radial serrations on its outer surface, this washer engages the workpiece, allowing displacement only on the inner surface. The expandable distance surpasses bolt longitudinal displacement. It uses clamping force rather than friction to secure bolts.

Cotter Pin and Slotted Nut:
Insert a cotter pin into the nut slot and bolt tail hole after tightening the nut. Spreading the split pin tail inhibits nut and bolt rotation. Slotted nuts combined with threaded rod bolts and cotter pins prevent relative rotation.
Lock Washer:
Bend and attach the lock washer to the nut's side and connector to lock it post-nut tightening. Double lock washers can interlock two bolts if needed.
Spring Washer:
A spring washer generates continuous elastic force upon compression, maintaining friction between the nut and bolt threads to prevent loosening. Its sharp opening corner embeds into the bolt and connected piece, preventing relative rotation.

Hot Melt Fastening Technology:
Applied without pre-opening, this cold-forming process taps and connects under closed profiles. Widely used in the automotive sector, it involves high-speed motor rotation causing plastic deformation through friction heat for self-tapping and screw connection.
Pre-Tightening:
High-strength bolts often eliminate the need for additional anti-loosening measures. The substantial pre-tightening force creates strong pressure between the nut and connected part, generating friction torque that counteracts nut rotation.

Conclusion:
Ensuring bolt security is paramount to maintaining equipment integrity. Employing effective anti-loosening bolt methods prevents failures and enhances safety. The eight methods discussed—double nut, self-locking nuts, wedge lock washer, cotter pin and slotted nut, lock washer, spring washer, hot melt fastening technology, and pre-tightening—provide diverse options to suit specific needs. With these techniques in your toolkit, you can confidently secure your fasteners and bolster the reliability of your projects.
Diablo 4, the much-anticipated action role-playing game, marks the return of the series' addictive loot-driven gameplay. Central to this experience are the crafting and item upgrading mechanics, which offer players the means to tailor their gear and unleash powerful items. In this article, we'll delve into the intricacies of these mechanics, revealing how players can enhance their equipment and forge potent items in Diablo IV.

Crafting Mastery in Diablo IV:
Crafting stands as a pivotal gameplay element in Diablo IV, granting players the ability to forge potent and customizable items that augment their character's capabilities. It instills a sense of progression and individuality, empowering players to create gear that aligns with their unique playstyles and strategic choices.
Gathering Essential Resources:
The crafting journey in Diablo IV commences with the acquisition of resources. Players can procure these resources by looting adversaries, exploring the game's rich environments, completing quests, and disassembling unwanted artifacts. Resource variety ranges from common materials like ores and textiles to rare and exotic components.
Navigating Crafting Recipes:
Crafting recipes function as blueprints, guiding players through the process of combining components to craft specific items. These recipes can be discovered by delving into dungeons, undertaking quests, interacting with NPCs, or acquiring rare loot drops. Each recipe outlines the required resources and the crafting station needed to fashion the desired item.
Crafting Stations' Role:
Scattered across the game world, crafting stations serve as interactive interfaces where players can utilize their amassed resources and recipes to initiate the crafting process. These stations specialize in different types of items such as weapons, armor, accessories, or consumables, enhancing the depth of the crafting experience.
Crafting Workflow:
Once the necessary materials have been amassed and a suitable crafting station located, players can embark on the crafting process. Selecting the desired item from their collection of recipes, they confirm their choice, prompting the crafting station to consume the requisite resources. A progress meter or timer denotes the duration of the crafting process.
Quality and Affixes:
Completion of the crafting process results in the creation of the item. The quality of the item, determining its base attributes and characteristics, hinges on various factors. Resource rarity and quality, player crafting proficiency, and potential bonuses tied to the crafting station all contribute to the item's quality. Moreover, crafted items can feature affixes, supplementary traits or attributes that amplify the item's prowess.
Enhancement through Iterative Crafting:
Diablo IV introduces an iterative crafting system enabling players to progressively enhance their crafted items. By utilizing crafting materials and additional resources, players can enhance existing items by introducing new affixes, improving statistics, or redefining existing attributes. This iterative process empowers players to continually refine and optimize their gear as they advance through the game.
Empowering through Item Upgrading:
Item upgrading serves as a dynamic and pivotal concept in Diablo 4. It empowers players to augment and customize their current gear to enhance its effectiveness and adaptability. Engaging in item upgrading enables players to optimize their equipment, accommodate different playstyles, and confront the escalating challenges that await.

Harnessing the Enchantment System:
A central aspect for the upgrading of Diablo IV's item is the enchantment system. This system empowers players to bestow potent magical properties upon their items, introducing diverse bonuses and effects that augment the item's attributes, alter its abilities, and introduce new powers.
Strategizing with Enchantment Slots:
Players can strategically introduce enchantments to specific slots on their items. The availability of these slots is determined by the item's rarity and quality. Common items may have fewer slots, while uncommon and legendary items possess a greater number of slots, providing players with diverse enhancement options.
Activation through Enchantment Runes:
The application of enchantments necessitates the possession of specific enchantment runes. These runes symbolize distinct magical properties and can be acquired through defeating foes, completing quests, or interacting with NPCs. Each enchantment requires a corresponding rune for activation.
Enchantment Application Process:
To initiate item enhancement, players must possess the desired enchantment rune in their inventory. Within the enchantment interface, they select the item for enhancement and the corresponding rune for the desired enchantment. Once an enchantment is applied, the item's traits and abilities are altered in accordance with the chosen rune.
Fluid Enchantment Management:
Enchantment management is a crucial aspect of item upgrading. Players can easily replace enchantment runes to swap enchantments, affording greater flexibility and adaptability. This feature enables players to fine-tune their gear in response to evolving playstyles or encountered challenges.
Embracing Enchantment Development:
As players progress through Diablo IV, they will acquire more potent enchantment runes. These high-level runes confer more impactful bonuses and unlock new opportunities for item enhancement. The pursuit of these advanced runes adds depth to the item upgrading process, motivating players to continually enhance their gear.
Elevating Legendary Items:
A distinctive upgrading mechanism for Diablo 4 legendary items. These extraordinary pieces of gear possess unique affixes and attributes. Players can amplify the power of their legendary artifacts by achieving in-game items or engaging in challenging activities, unlocking additional affixes and enhancing their overall capabilities.
Conclusion:
The crafting and item upgrading mechanics form the bedrock of Diablo IV's progression system, providing players with the means to shape their destinies and unleash their full potential. Crafting empowers players to design distinct items tailored to their playstyles, while item upgrading enables constant refinement and adaptability in the face of new challenges. Players can rise to greatness and vanquish the demonic forces that haunt the realm of Sanctuary by harnessing resources, mastering recipes, utilizing crafting stations, and embracing enchantments. In Diablo IV, the crafting hammer and mystical runes hold the power to shape one's destiny, ready to be wielded by those bold enough to venture forth.
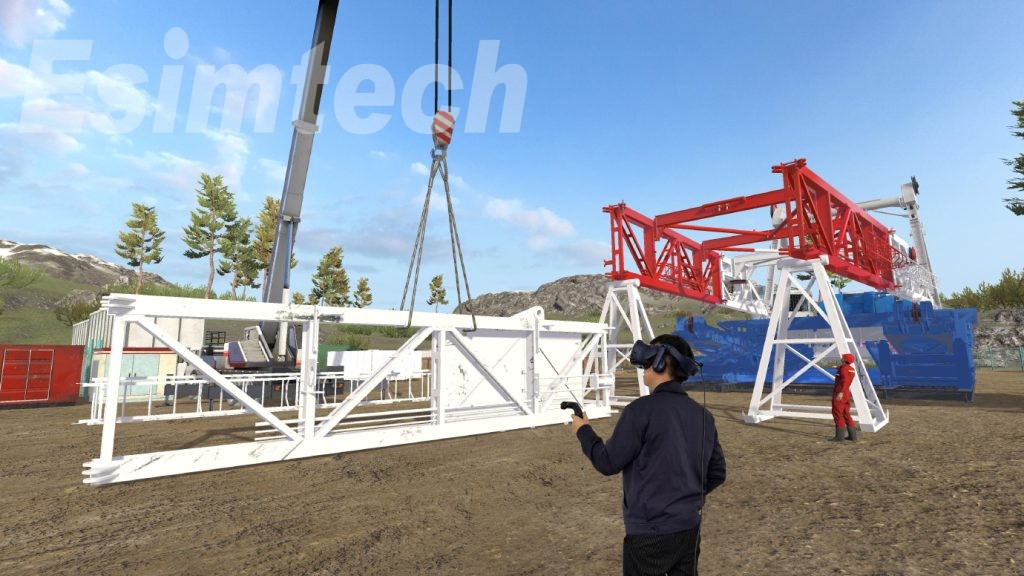
The intricate and multifaceted nature of land rigs is crucial for oil and gas production from onshore fields. Setting up these rigs demands complex operations and a profound understanding of the processes involved. To address these challenges, the introduction of land rig installation simulator has ushered in a new era of training that focuses on safety, efficiency, and practical knowledge. This article delves into the significance and advantages of using land rig installation simulators.

The Significance of Land Rig Installation Simulators:
Historically, manual labor, hands-on training, and practical experience were the cornerstones of land rig installation training. However, this approach posed challenges such as steep learning curves, safety hazards during training, and the potential for installation errors or delays. Enter the land rig installation simulator, a virtual environment that replicates actual installation procedures. This simulator revolutionizes training by offering a risk-free space for learning, optimization, and improved safety.
Functionality of the Land Rig Installation Simulator:
Powered by advanced technology, the simulator employs computer-based training and simulation programs to replicate the intricate processes involved in setting up a land rig. Utilizing sophisticated 3D modeling, physics-based algorithms, and real-time simulations. The land rig installation simulator provides an immersive experience. It factors in equipment specifications, environmental conditions, and operational constraints to create a lifelike virtual representation of the installation process.
Advantages of Using the Land Rig Installation Simulator:
Elevating Safety and Efficiency:
The primary objective of the land rig installation simulator is to enhance safety and efficiency during rig setup. Traditional on-site training can be risky for both workers and equipment. With the simulator, trainees can practice various scenarios in a controlled environment, reducing the potential for accidents and downtime.
Realistic Simulation Environment:
The simulator faithfully recreates the complex conditions encountered during land rig installation. Trainees navigate through each phase with remarkable accuracy, from initial site preparation to mast assembly, drill pipe insertion, and substructure construction. The simulated environment replicates diverse weather patterns, topographical challenges, and operational complexities akin to real-world scenarios.
Comprehensive Training Modules:
The land rig installation simulator offers an array of training courses covering all aspects of rig installation. Trainees can familiarize themselves with tools, learn safety protocols, troubleshoot common issues, and acquire the expertise required for successful installations. This practical experience equips trainees without subjecting them to real-world risks, ensuring their preparedness for challenges.
Real-Time Feedback and Assessment:
The simulator's real-time feedback and evaluation capabilities are instrumental. Immediate guidance and performance evaluations empower trainees to identify weaknesses and refine their techniques. This feedback-driven approach nurtures a culture of continuous learning, enabling individuals to track their progress and strive for excellence in rig installation practices.
Cost-Effective Training Solution:
Integrating the land rig installation simulator as a training tool yields significant cost-saving benefits. It eliminates the need for costly on-site training exercises that demand specialized equipment, travel expenses, and prolonged downtime. By delivering a realistic and immersive experience, the simulator accelerates trainee proficiency, optimizing resource utilization and operational efficiency.
Reducing Environmental Impact:
In addition to financial and safety benefits, the land rig installation simulator contributes to reducing environmental impact. Conventional training methods can result in substantial fuel consumption, greenhouse gas emissions, and potential land and water contamination. The simulator allows in-depth training without these environmental costs, promoting sustainability within the industry.
Conclusion:
The advent of land rig installation simulators marks a transformative advancement in training methodologies. This technology offers a secure, lifelike, and immersive learning environment for mastering crucial skills, negating the risks associated with traditional on-site training. By enhancing safety, efficiency, and environmental responsibility, these simulators are reshaping the landscape of land rig installation training in the oil and gas industry.
A shaking incubator, an essential piece of laboratory equipment categorized as a biochemical instrument, serves as a specialized cultivation tool for the growth and propagation of molds and microorganisms. This device creates controlled conditions encompassing temperature, humidity, light, carbon dioxide concentration, oscillation parameters, and more. Its utility spans across diverse fields including life sciences, genetics, agriculture, biomedicine, food industry, and various biochemical studies. Comprising components like a motor, fan, shaking plate, controller, heating tube, and temperature sensor, the shaking incubator comes in different types - benchtop, vertical, and horizontal. This article emphasizes the maintenance and cleaning practices crucial for the optimal functioning of a shaking incubator.

Maintenance of a Shaking Incubator:
Proper care and maintenance play a pivotal role in ensuring the shaking incubator's operational efficiency and longevity.
Regular checks, ideally every three months during operation, are imperative. Inspect fuses, control elements, fastening screws, and assess the presence of moisture or debris near the motor and controls.
Grease the transmission part's bearings every six months, replenishing approximately one-third of the bearing space. A preliminary grease fill is done at the manufacturer's end.
Routine usage results in natural wear and tear. Unusual noises from the motor or compressor indicate potential issues. Seek guidance from the manufacturer for professional advice and resolution.
Prevent continuous start-ups of the compressor to prolong its lifespan.

Cleaning a Shaking Incubator:
Surface Cleaning
Utilize detergent to clean the exterior of the shaking incubator. For disinfection, consider using quaternary ammonium. Wipe the surface with a damp cloth and mild detergent, followed by thorough drying with a clean cloth. Inside and outside surfaces of the glass door can be cleaned with a soft cloth and mild detergent solution, ensuring no residue remains.
Internal Cleaning
Avoid high-pressure water sprays for internal cleaning to prevent damage to critical components. Post-cleaning, drain any liquids properly, taking care not to expose the bottom drive system or electrical elements to excess moisture.
Surrounding Area Maintenance
Maintain an unobstructed space around the shaking incubator for efficient heat dissipation. Regularly clean the vicinity, including the floor and nearby regions, to ensure a pollution-free environment. Establish a cleaning schedule, keeping detailed records of cleaning activities. In case aggressive floor cleaners are used in the lab, promptly wipe off any spills on the equipment.
Cleaning the Shaker
For broken shaker flasks or leaked medium, remove the shaker plate to facilitate proper cleaning. When dealing with broken glass, follow safety protocols by wearing protective gloves and meticulously removing fragments. Disinfect affected parts with a cloth soaked in disinfectant. Always use a soft cloth and mild detergent for cleaning the shaker and its components, employing disinfectant like quaternary ammonium for effective sterilization.
Conclusion
Maintaining and cleaning a shaking incubator is pivotal to its reliability and operational excellence. Regular checks, appropriate lubrication, and adherence to cleaning protocols ensure the longevity and effectiveness of this essential laboratory equipment.
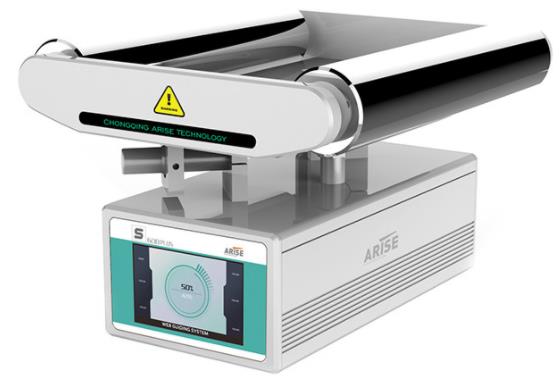
Industries reliant on precision, such as printing, packaging, and paper manufacturing, find an indispensable ally in the form of a web guide system. This technology ensures meticulous alignment and seamless tracking of web content throughout the production journey. However, the pinnacle of performance is attainable only through meticulous installation and calibration. This article ventures into the intricacies of web guide system installation, elucidating best practices that foster efficiency, minimal downtime, and operational excellence for manufacturing machines.
Laying the Groundwork: Preparing for Web Guide System Installation
Embarking on the installation journey mandates a thorough prelude. Delve into system specifications, conduct a site reconnaissance, and ensure all requisites tools and components stand at the ready. Immersing oneself in the manufacturer’s guidelines and instructions proves crucial, for they harbor invaluable insights that align with the web guiding system at hand.
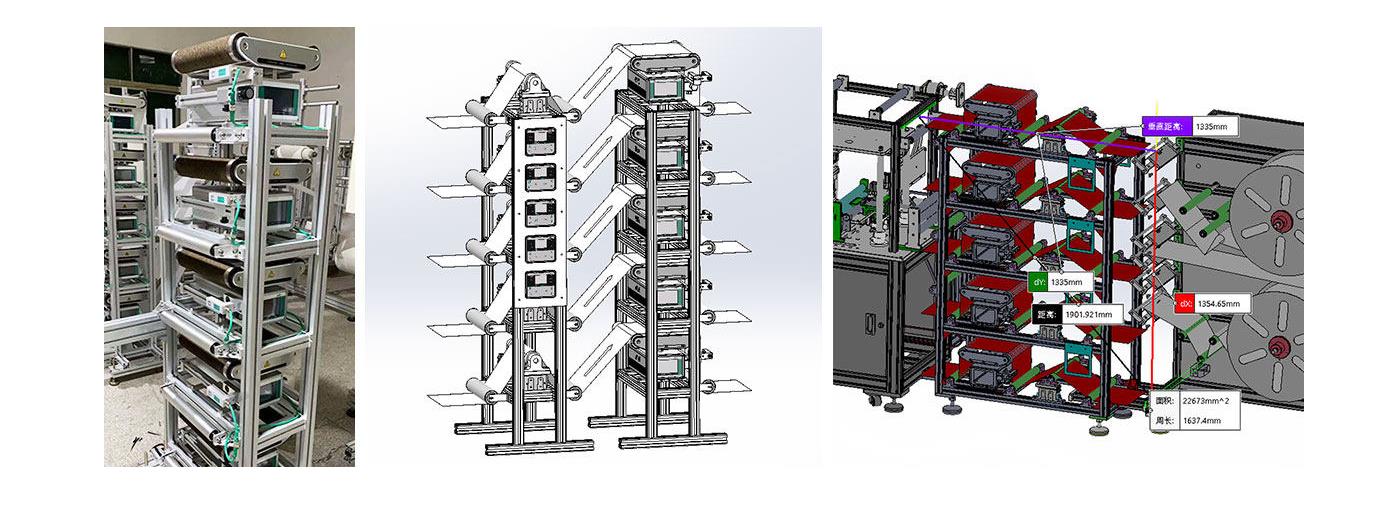
The Art of Mounting and Aligning Web Guide Systems
The foundation of the web guide system's prowess rests in its installation. Opt for a location conducive to maintenance and adjustments. The chosen mounting surface must possess the structural integrity to support the system's weight. Align with precision the manufacturer's recommendations, including mounting height, distance from neighboring equipment, and other critical specifications.
Alignment emerges as the cornerstone for accurate web tracking. Forge a parallel trajectory between the web guide system and the web path, ensuring perpendicularity to the web material's course. Precision leveling tools materialize as allies in this pursuit. Even a hair's breadth of misalignment during installation can trigger tracking predicaments, undermining the system's performance.
The Prelude to a Seamless Web Path: Preparation
Prudent preparation of the web path is imperative before web guide system installation. Eradicate debris, obstructions, and vibration sources from the route. A clear and unhindered web path curbs the risk of material breakage and tracking discrepancies.
Thoroughly inspect rollers, pulleys, and other web path constituents for signs of wear or damage. Exchange worn elements to guarantee uninterrupted web movement. Additionally, sanitizing the web path from dust, grime, or residues orchestrates a conducive environment, unfettered by hindrances.
Strategic Sensor Placement: Enabling Optimal Performance
Sensor placement in the installation and calibration of web guide control systems stands as a linchpin. These sensors vigilantly oversee web material's alignment and location, enabling the system to effectuate requisite adjustments for precise tracking. Here are pivotal guidelines governing sensor placement:
Proximity to the Web Material
Plant the sensors in close proximity to the web material, refraining from physical contact. This tactic assures sensors discern the material's alignment and location with utmost precision. Too great a distance can impede effective tracking, leading to inaccuracies.
Alignment Par Excellence
Orchestrate sensor alignment congruent to the web path. Parallelism empowers sensors to accurately monitor web material movement. Misalignment could spawn erroneous readings, jeopardizing the system's tracking efficiency. Precision leveling tools ascertain optimal alignment.
A Multitude of Sensors
Depending on the complexity of the web path and desired tracking precision, multiple sensors may prove requisite. Placing sensors at strategic junctures along the web path confers a comprehensive perspective of the material's position and alignment. This fortifies the system's capacity for exact adjustments, culminating in superior tracking performance.
Stability is Paramount
Secure sensors firmly to quell movement or vibration during operation. Loose or unstable sensors beget erroneous readings and tracking glitches. Leveraging manufacturer-prescribed mounting brackets or fixtures is indispensable for ensuring stability.
Meticulous Sensor Lighting Considerations
Pay heed to lighting conditions in the installation locale. Excessive glare, shadows, or light fluctuations impede sensor efficacy. Shield sensors from direct sunlight or potent light sources that can impede precise web material detection.
Navigating the Calibration Odyssey
Calibration emerges as the linchpin of web guide systems, harmonizing system parameters with online material to attain impeccable tracking. Calibration epitomizes the process through which the system attunes its alignment mechanisms. The calibration process follows a systematic course:
Harvesting Pertinent Information
Collect essential data concerning web material attributes and specific production prerequisites preceding calibration initiation. This entails factors like web width, desired alignment precision, and web speed. Manufacturer stipulations and recommendations form a vital compass during this phase.
Steering System Configuration
Leverage the system's control interface or software to configure parameters. Input critical information such as web width, speed, and alignment precision objectives. This control interface might encompass options for refining sensor sensitivity, control responsiveness, or other system-relevant parameters.
Test Run: A Crucial Litmus Test
Initiate a test run with a sample web material to gauge initial performance. Monitor how the system tracks the material's course and assesses alignment preservation. Scrutinize any anomalies or deviations from the expected trajectory during this trial.
Fine-Tuning Iterations: Precision in Progress
Tailor system parameters based on outcomes from the initial test run to elevate tracking accuracy. Fine-tuning encompasses sensor sensitivity, control response times, or filtering settings, contingent on the system's specifics. Iterations of these refinements shall vary based on the system's nuances and capabilities.
Perpetual Test Iterations
Upon effecting necessary adjustments, rerun the test with the sample web material. Evaluate the system's tracking prowess against desired alignment benchmarks. Persist in refining parameters and repeating test iterations until attaining the desired tracking precision.
Ultimate Fine-Tuning: Elevating Excellence
Consider supplementary fine-tuning avenues post-precise tracking achievement. This might encompass optimizing tension control mechanisms, edge detection settings, stability controls, or other system-specific components. Manufacturer literature or expert consultation stands as the guiding light for this phase.
Safeguarding Sustained Brilliance: Post-Installation Vigilance
Beyond the successful installation and calibration, ongoing vigilance and maintenance hold the reins for sustained performance. Instating a proactive maintenance regimen entails regular assessment and cleansing of system sensors, rollers, and other elements. Routinely scrutinize for signs of wear, misalignment, or any issues that could undermine system prowess.
Amid production runs, monitor system performance for deviations or tracking anomalies. Scrutinize performance metrics and undertake suitable adjustments through the control interface or software. Swiftly address emerging issues to curtail downtime and assure product consistency.
Summary
In the synthesis of web guide system installation and calibration lies the key to impeccable web tracking and unfaltering manufacturing operation. By adhering to the outlined best practices, you sidestep tracking discrepancies, minimize downtime, and fortify productivity. Pledge allegiance to manufacturer guidelines and seek expertise if necessary. With a meticulously installed and calibrated web guide system, your operations attain optimal efficiency, consistently delivering products of the highest caliber.