Drilling operations in the petroleum industry are inherently risky, demanding extensive training and preparation to ensure staff safety and optimize operational efficiency. In this context, innovative training tools play a crucial role. One such innovation is the portable drilling well control simulator, designed to provide realistic, hands-on training experiences in a compact and portable format.

Simulating Realistic Well Control Scenarios:
Well control is paramount in drilling operations, where the stakes are high. The drilling teams must receive realistic and effective training to ensure worker safety and equipment integrity. Simulators that faithfully recreate well-control scenarios are indispensable in this regard.
Trainees benefit from hands-on experience in addressing critical situations by simulating realistic well control scenarios. These simulators replicate the complexities and challenges encountered during drilling operations, enabling learners to develop essential skills, knowledge, and confidence to effectively manage emergencies. Let's delve into how these simulators achieve such realistic simulations.
1. Dynamic Physics and Fluid Modeling:
Well control simulators employ intricate physics and fluid modeling methods to simulate the behavior of fluids encountered during drilling. They accurately represent the dynamic interactions between drilling mud, formation pressures, and wellbore conditions. By faithfully simulating fluid dynamics, these simulators can precisely replicate pressure fluctuations, influxes, and outflows that occur during well control incidents.
2. Real-Time Monitoring and Feedback:
Simulators provide real-time monitoring of critical parameters, including wellbore pressure, flow rates, and choke settings. Trainees can continuously monitor and analyze changing well conditions, allowing them to make informed decisions based on simulated data. Instant feedback enables trainees to assess the effectiveness of their actions and make real-time adjustments.
3. Emergency Scenarios:
Well control simulators offer a range of emergency scenarios to challenge trainees' abilities. From well kicks and blowouts to loss of circulation, these severe conditions demand prompt and effective action. By simulating these emergencies, trainees can practice essential well control techniques, such as shutting down the well, managing pressure, and executing situation-specific well control procedures.
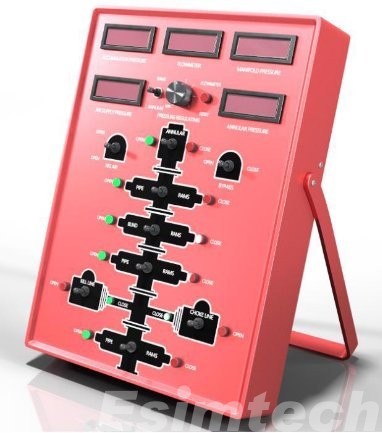
4. Equipment and Control Panel Replication:
To create a lifelike training environment, simulators replicate drilling rig equipment and control panels. Trainees can interact with virtual control panels and operate drilling equipment, including Blowout Preventers (BOPs), mud pumps, and chokes. This hands-on training enhances trainees' familiarity with the equipment, improving their ability to respond swiftly and efficiently during well control incidents.
5. Communication and Decision-Making:
Well control simulators simulate the communication network and dynamics within a drilling team. Trainees practice coordinating actions with team members, sharing critical information, and managing resources effectively. This collaborative environment fosters teamwork and prepares trainees for the coordination required in real-world well control situations.
6. Variable Training Difficulty:
Simulators offer the flexibility to tailor the difficulty level of training scenarios to match the experience and skill levels of trainees. Novice drillers can start with basic scenarios and progress to more complex and challenging ones as their proficiency grows. This adaptive training approach ensures that students are adequately prepared for a wide range of well control scenarios encountered in the field.
Key Features and Benefits of Portable Drilling Well Control Simulators:
1. Hands-on Training:
The simulator provides a hands-on learning experience for well control techniques. Trainees actively engage with simulated equipment, control panels, and well control processes, gaining practical experience in handling crises and making critical decisions. This interactive approach enhances skill development and boosts trainees' confidence.
2. Portability and Flexibility:
The portable nature of the simulator allows it to be easily transported and set up in various locations, including training centers, on-site training facilities, or even offshore platforms. This flexibility ensures convenient access to well control training, eliminating the need for trainees to travel long distances for training purposes.
3. Risk-free Environment:
The simulator creates a risk-free training environment where learners can practice and refine their well control skills without endangering crew safety or risking damage to equipment. It allows trainees to experiment with different strategies and techniques, enabling them to learn from failures and develop effective responses to well control challenges.
4. Performance Evaluation and Feedback:
The simulator tracks trainees' progress and provides instant feedback on their actions and decisions. This evaluation approach empowers trainees to assess their performance, identify areas for improvement, and fine-tune their well control techniques. Continuous feedback and performance metrics enable focused training interventions and allow for monitoring progress over time.
5. Cost-Effective Training:
Investing in a portable drilling well control simulator can lead to long-term cost savings in training. Companies can reduce expenses related to travel, accommodation, and equipment rental by providing on-site or nearby well control training. The durability and reusability of the simulator contribute to sustained cost efficiency.
6. Enhancing Safety Awareness:
By simulating well control scenarios, the simulator enhances safety awareness among trainees. It allows them to experience potential risks and consequences associated with well control incidents firsthand, instilling a profound understanding of the significance of safety protocols and the importance of proactive risk management.
7. Team Collaboration and Communication:
The simulator promotes effective communication and teamwork among drillers and well control teams. In a virtual setting, trainees can practice coordinating actions, sharing information, and making group decisions. This fosters teamwork, enhances coordination skills, and improves the overall effectiveness of well control operations.
8. Scenario Customization:
The simulator offers the flexibility to tailor training scenarios to specific learning objectives. This customization allows trainees to gain firsthand experience with potential hazards and consequences of well control incidents, reinforcing the importance of safety precautions and proactive risk management.
9. Continuous Training and Skill Development:
The simulator supports ongoing training and skill development. It can be used to offer increasingly complex scenarios and challenges as trainees progress and master fundamental well control procedures. This incremental training approach ensures continuous skill growth and prepares learners for a wide range of real-world well control situations.
Conclusion:
The portable drilling well control simulator represents a significant advancement in safety and efficiency within the petroleum industry. It serves as a vital tool in training the next generation of competent drilling professionals as the industry continues to prioritize safety and enhance operational efficiency. With its realistic simulations, hands-on training, and numerous benefits, this innovative training tool contributes to safer and more efficient drilling operations.
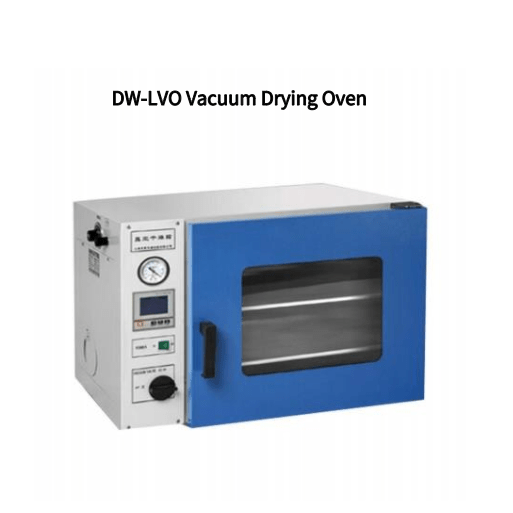
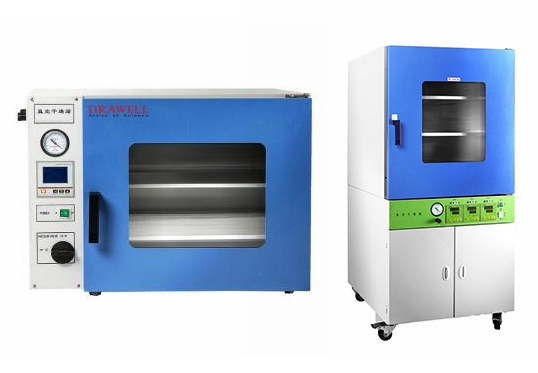
A vacuum drying oven is a crucial piece of auxiliary drying equipment, widely used in various applications due to its versatility. However, its operation is more intricate than that of regular drying ovens, requiring careful attention to detail. In this guide, we will walk you through the precautions for each step of using a vacuum drying oven effectively and safely.
1. Sample Placement:
When placing materials to be dried in the vacuum drying oven, follow these precautions:
Never Heat Empty: Do not turn on the heating element before placing your samples in the oven.
Ensure Adequate Space: Leave some space above and below the samples to allow for proper airflow within the oven.
Phase Changes: If your samples undergo phase changes during the drying process, use a tray to contain them to prevent contamination of other samples.
Protect the Vacuum Port: If dry materials become lighter and smaller after drying, install a barrier net over the vacuum port inside the oven to protect the vacuum pump or solenoid valve from damage due to inhaled dry matter.
No Hazardous Materials: Do not place any liquid solvents or items with low ignition or boiling points (below 150°C under vacuum) in the vacuum drying oven.
2. Closing the Oven Door:
When closing the door of the vacuum drying oven, follow these precautions:
Gentle Closure: Close the oven door gently to avoid excessive vibrations within the oven chamber.
Check Sealing: Ensure that the door is properly aligned with the silicone sealing strip and that any bolts on the door are secure before closing.
3. Initiating Vacuum:
When starting the vacuum within the vacuum drying oven, adhere to these precautions:
Set Vacuum Limits: Choose the appropriate vacuum pump limit based on its performance and specifications.
Proper Shutdown: After reaching the desired vacuum level, close the vacuum valve and turn off or disconnect the vacuum pump to prevent backflow.
Monitor Gauge: Keep an eye on the vacuum pressure gauge to ensure stable readings without significant fluctuations.
Boost Vacuum If Necessary: If the vacuum level falls below the requirements for drying, restart the vacuum pump and valve to enhance the vacuum, thus prolonging the vacuum pump's lifespan.
4. Heating:
During the heating process, consider these precautions:
Stable Vacuum Required: Maintain a stable vacuum state during heating. Fluctuations in internal and external pressures and temperatures can lead to issues like outside air entering the chamber.
Heating Indicator: Pay attention to the heating indicator, which remains lit while heating. Once the set temperature is reached, heating stops automatically, and the indicator turns off. Heating resumes when the temperature falls below the preset level.
Monitor Temperature Display: Ensure that the temperature is displayed accurately. If the indicator is off, immediately cut power and inform the equipment operator.
5. Temperature Setting:
When setting the desired temperature within the vacuum drying oven, follow these precautions:
Appropriate Setting: Set the temperature within the recommended range. In a vacuum, materials may have dramatically lower ignition and boiling points, and inappropriate temperatures can cause melting or agglomeration.
Monitor Display: Confirm that the digital temperature display is functioning correctly, without flickering or unusual readings. If issues arise, disconnect the power and report them.
Verification: Leave the oven only when the actual temperature matches the set temperature, and the heating indicator light is off.
Continuous Supervision: Ensure the oven is monitored for normal operation and any changes in drying materials. In case of anomalies, promptly cut power, open the vent valve, and report the issue.
6. Sampling:
When removing samples from the vacuum drying oven, adhere to these precautions:
Proper Deflation: Gradually open the air release valve and wait until the vacuum level reaches 0 before opening the oven door.
Partial Valve Opening: Avoid fully opening the valve to prevent external air from rushing into the chamber, which can lead to pollution and contamination.
Forbidden Below 0 Vacuum: Never open the oven door when the vacuum level is below 0.
Stuck Door Sealing: If the oven door's sealing silicone rubber becomes deformed due to prolonged vacuum exposure, do not force it open. Wait for the rubber to return to its original state before attempting to open the door.
Valve Closure: After sampling, promptly close the air release valve.
Additional Precautions:
Grounding: Ensure effective grounding of the vacuum drying oven's shell for safety.
Environment: Operate the oven in an environment with relative humidity ≤85% RH, no corrosive gases, no strong vibrations, and no strong electromagnetic fields.
Cleaning: Regularly clean the vacuum drying oven. When cleaning the door glass, avoid using reactive chemical solutions and use a soft cotton cloth instead.
By following these precautions at each step of using a vacuum drying oven, you can ensure the safe and efficient operation of this essential equipment, allowing you to carry out your drying processes effectively and with confidence.
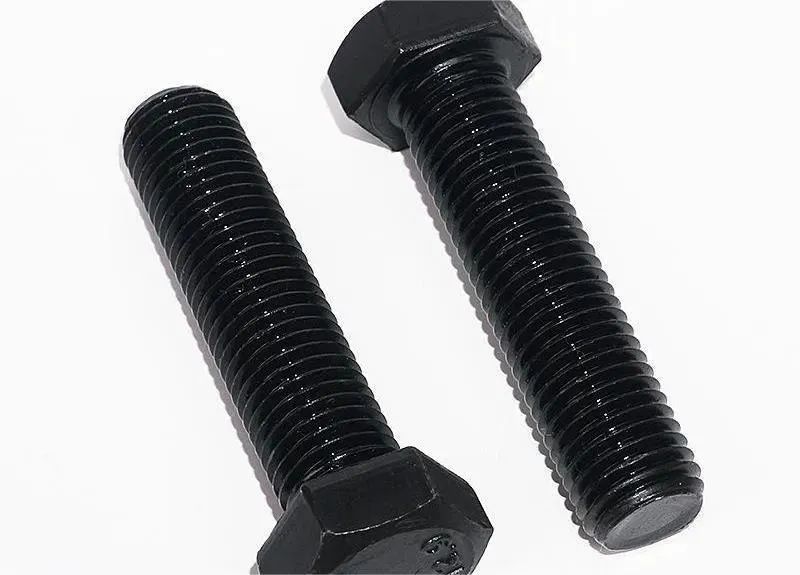
Bolts are ubiquitous in both industrial production and daily life. The performance grade of bolts, particularly in steel structure connections, encompasses a range of more than ten grades, including 3.6, 4.6, 4.8, 5.6, 6.8, 8.8, 9.8, 10.9, 12.9, and others.
Bolts rated 8.8 and above are crafted from low carbon alloy steel or medium carbon steel and undergo heat treatment processes like quenching and tempering. These are generally referred to as high-strength bolts, while the remainder are termed ordinary bolts.
The Principle of High-Strength Bolt Connections
High-strength bolt connections offer several advantages, including straightforward assembly, robust mechanical performance, disassembly capability, resistance to fatigue, and stability under dynamic loads.
The high-strength bolt connection process involves tightening the nut with a specialized wrench to generate substantial and controlled pre-tension in the bolt. This pre-tension is transmitted uniformly to the connected components through the nut and backing plate. Under the influence of this pre-tension, a substantial frictional force arises along the surfaces of the connected components. As long as the axial force remains below this frictional force, the components will not slip, and the connection remains intact. This forms the fundamental principle of high-strength bolt connections.
Distinguishing High-Strength Bolts from Ordinary Bolts
1. Material Difference
High-strength bolts can bear greater loads than their ordinary bolt counterparts of the same specification, primarily due to differences in material strength.Ordinary Bolts: These are typically composed of Q235 (A3) material.
High-Strength Bolts: High-strength bolts are manufactured from high-quality materials, such as 35# steel or other superior materials. Following fabrication, they undergo heat treatment to enhance their strength.
2. Strength Level Difference
High-strength bolts come equipped with higher strength levels compared to ordinary bolts.
High-Strength Bolts: Commonly utilized grades include 8.8s and 10.9s, with 10.9 being the more prevalent choice.
Ordinary Bolts: Ordinary bolts exhibit lower strength levels, typically ranging from 4.4, 4.8, 5.6 to 8.8.
3. Stress Characteristics Difference
The stress distribution and transfer mechanisms vary between high-strength bolts and ordinary bolts.
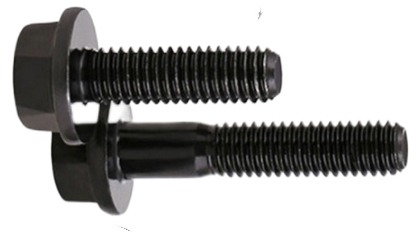
High-Strength Bolts: High-strength bolts operate by inducing pre-tension and transferring external forces through friction. In addition to their superior material strength, high-strength bolts generate significant pre-tension forces, resulting in the compression of connecting members and the creation of substantial friction forces perpendicular to the screw direction.
Ordinary Bolts: Ordinary bolt connections rely on the shear strength of the bolt rod and the pressure against the hole wall to transmit shear forces. When the nut is tightened, the pre-tension generated is minimal and can be disregarded in its impact.

4. Usage Perspective
The choice between high-strength bolts and ordinary bolts depends on the specific application and structural requirements.
High-Strength Bolts: High-strength bolts are commonly employed for critical components in building structures. They are often used for permanent connections, with two primary types—friction-type, applied with torque wrenches to achieve specified pre-stress, and pressure-type, which are unscrewed using special tools.
Ordinary Bolts: Ordinary bolts, with their lower shear performance, find application in secondary structural components. These bolts only require tightening and can be reused. Conversely, high-strength bolts are not reusable due to their pre-stressed nature.
In summary, understanding the distinctions between high-strength bolts and ordinary bolts is crucial for selecting the appropriate fasteners for different structural and load-bearing requirements in construction and engineering applications.
In the dynamic and high-stakes world of the oil and gas industry, the safety and efficiency of drilling operations are paramount. Even minor errors can lead to significant financial losses and environmental damage. Traditionally, training in this sector has relied on a combination of classroom instruction and hands-on experience. However, a transformative technology has emerged to enhance training methodologies and improve drilling proficiency – the Cyberchair Drilling Simulator. In this article, we will explore the features, functionalities, and implications of the Cyberchair Drilling Simulator in the oil and gas industry.
Why Choose the Cyberchair Drilling Simulator for Training?
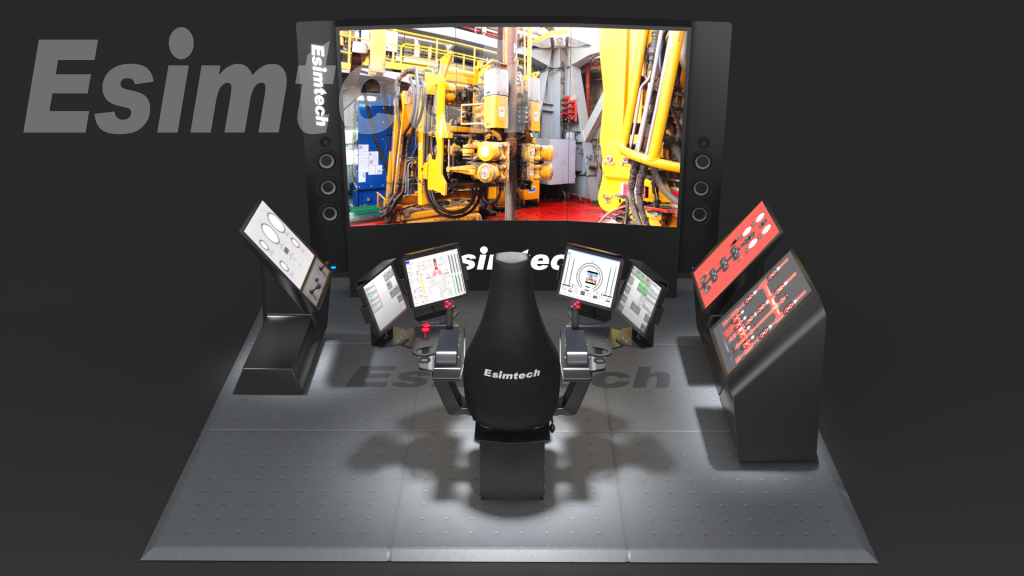
The Cyberchair Drilling Simulator represents an innovative virtual reality (VR) training system that offers a realistic and immersive experience of operating drilling equipment. It seamlessly integrates cutting-edge VR technology with advanced drilling simulations to replicate various drilling scenarios within a safe environment. Comprising a physical chair with haptic feedback sensors, a VR headset, and controls resembling an actual drilling console, trainees can don the VR headset, take a seat in the Cyberchair, and immerse themselves in a virtual drilling rig that simulates the conditions and challenges encountered in real-world drilling operations.
Key Features and Functionalities of the Cyberchair Drilling Simulator
1. Realistic Virtual Environment:
The simulator generates an incredibly immersive and lifelike virtual environment that closely mirrors actual drilling locations.
Graphics, acoustic effects, and physics-based simulations work harmoniously to provide trainees with a realistic experience.
The virtual environment can replicate diverse scenarios, including offshore and onshore drilling sites, various weather conditions, and challenging operational situations.2. Interactive Control Panel:
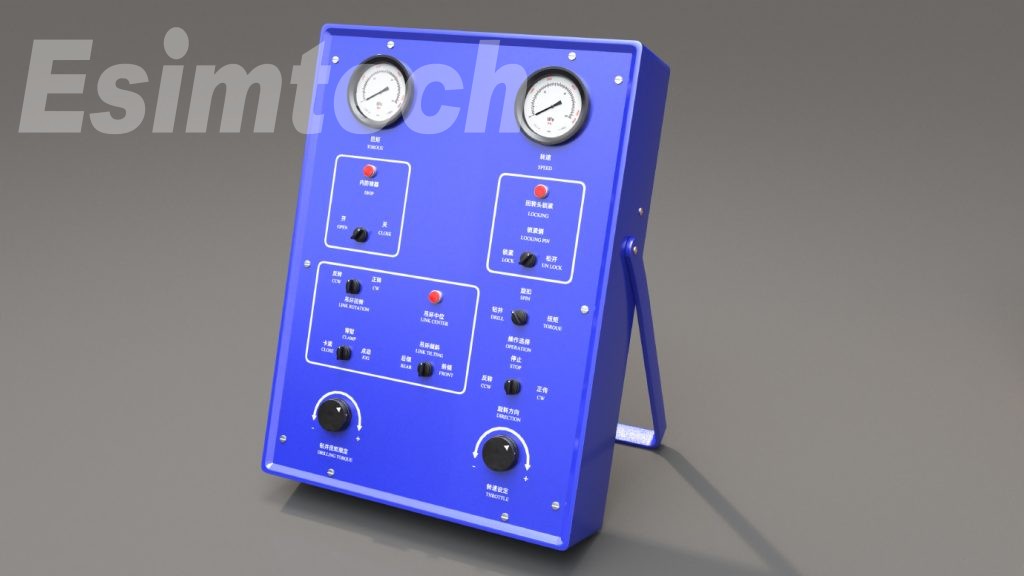
The simulator boasts a control panel that closely mimics that of a drilling rig.
Trainees can interact with levers, switches, buttons, and touchscreens just as they would during real-world drilling operations.
This hands-on experience aids in the development of muscle memory and familiarity with drilling equipment.
3. Haptic Feedback Sensors:
The Cyberchair Drilling Simulator is equipped with haptic feedback sensors integrated into the chair.
These sensors allow trainees to experience vibrations, resistance, and other tactile sensations associated with drilling tasks, enhancing the sense of touch and physical feedback.
This haptic input greatly enhances simulation realism, immersing trainees in the training experience.
4. Diverse Training Scenarios:
The simulator encompasses a wide range of training scenarios, covering various drilling techniques, equipment types, and operational challenges.
Trainees can simulate drilling for different energy sources, such as oil, natural gas, or geothermal energy.
They may also encounter scenarios like well blowouts, pressure control issues, wellbore stability concerns, and other unexpected events.
The ability to simulate multiple scenarios fosters critical thinking and problem-solving skills in trainees.
5. Simulation of Drilling Technologies:
The Cyberchair Drilling Simulator can replicate the use of various drilling methods prevalent in the industry.
Trainees can practice directional drilling, hydraulic fracturing (fracking), and other specialized procedures.
This allows users to grasp the intricacies of each technology and gain hands-on experience without the need for real-world equipment.
6. Real-time Performance Monitoring:
The simulator features data collection and analysis capabilities, enabling real-time monitoring of learner performance.
Trainers can track parameters such as response time, accuracy, and decision-making abilities.
This data empowers trainers to provide immediate feedback and identify areas where learners can improve, promoting continuous skill development during training.
7. Data-driven Training Programs:
The simulator's data can be analyzed to create data-driven training programs.
Trainers can tailor the training curriculum to address specific weaknesses or focus on honing particular skills by identifying patterns and trends in learner performance.
This customized approach enhances the simulator's effectiveness and ensures participants receive targeted instruction.
8. Remote Accessibility:
The Cyberchair Drilling Simulator offers remote accessibility, enabling trainees to participate in training sessions from multiple locations.
This feature proves especially valuable for companies with multiple training facilities or learners who cannot attend physical training centers.
Remote accessibility enhances flexibility and enables continuous training, even when physical presence is not feasible.
Implications of the Cyberchair Drilling Simulator for the Oil and Gas Industry
The Cyberchair Drilling Simulator holds profound implications for the oil and gas industry, influencing various facets of operations, training, safety, and efficiency.
1. Enhancing Training and Skill Development:
By providing a realistic and immersive virtual environment for drilling operations, the simulator revolutionizes training methodologies.
It offers hands-on training, allowing trainees to practice operating drilling equipment in a safe environment.
This immersive training enhances learners' skills, knowledge, and decision-making abilities, making them more proficient in their roles.
2. Improving Safety:
Safety is a top priority in the oil and gas industry, and the Cyberchair Drilling Simulator contributes to enhancing safety protocols.
Trainees can develop the necessary skills to respond effectively to real-world emergencies within a controlled environment.
This reduces the likelihood of drilling accidents, equipment damage, and injuries.
3. Reducing Costs:
Traditional training methods in the oil and gas industry often involve expensive on-site drilling activities or sending trainees to remote locations for hands-on experience.
The Cyberchair Drilling Simulator eliminates the need for real equipment and travel expenses, providing a cost-effective alternative.
Companies can deliver virtual training, reducing costs while maintaining high-quality learning experiences.
4. Time Efficiency:
The simulator accelerates skill development by offering trainees unrestricted access for drills and experience acquisition, even during downtime.
It can replicate challenging and uncommon drilling scenarios that might take years to encounter in real-world operations.
This shortens the learning curve, ensuring trainees are well-prepared for actual drilling operations.
5. Addressing Skill Shortages:
The oil and gas industry faces a shortage of skilled drilling personnel due to an aging workforce and limited new talent entering the field.
The Cyberchair Drilling Simulator addresses this skills gap by providing a platform for training and skill development.
Companies can efficiently train new hires and upskill existing employees, ensuring a competent workforce to meet industry demands.
6. Digital Transformation:
Adoption of the Cyberchair Drilling Simulator represents a significant step in the industry's digital transformation journey.
It reflects the industry's embrace of advanced technologies to optimize operations, enhance efficiency, and improve safety.
The simulator complements ongoing efforts to leverage digital tools and data-driven approaches for better decision-making and performance optimization.
7. Data Analytics for Continuous Improvement:
The simulator's data collection and analysis capabilities provide insights into learner performance.
Analyzing this data allows for the continuous improvement of training programs, safety protocols, and operational processes.
A data-driven approach aids in refining training procedures, optimizing drilling processes, and enhancing overall operational performance.
In Summary:
The Cyberchair Drilling Simulator plays a pivotal role in enhancing the safety, efficiency, and sustainability of operations in the oil and gas industry. Its immersive virtual environment, realistic simulations, and interactive controls create a safe and cost-effective platform for trainees to acquire essential drilling skills.
Refractive index measurement stands as a straightforward and precise technique for assessing the purity of organic compounds. In numerous binary systems, a definitive correlation exists between the refractive index and composition, making it a valuable parameter for composition analysis. The refractive index is a vital optical property of transparent materials, particularly when it falls within the range of 1.30 to 1.70. In this range, the total reflection method becomes advantageous due to its convenience, rapid operation, minimal environmental requirements, and the absence of a necessity for a monochromatic light source.

The refractometer, constructed using the total reflection method, serves as a specialized instrument for gauging the refractive index of transparent or translucent liquids. The utilization of an automatic refractometer to ascertain liquid composition is a prevalent technique in petrochemical, light industrial food, and other production and scientific research fields.
Functions of the Light Meter
Multilingual Interface and Data Output: Equipped with a full-color touch screen and a robust processor, the light meter offers menus in multiple languages. It facilitates data output via RS232, USB, and Bluetooth, enabling connections to computers, printers, and auxiliary devices like barcode readers.
Versatile Measurement Items: The LED touch screen allows users to switch between 16 different measurement parameters, including Refractive Index, Brix, Temperature Corrected Refractive Index, Temperature Corrected Brix, Zeiss, Butyric Acid, HFCS (42), HFCS (55), Urine Liquid SG, Osler, Baume, Babo, sodium chloride, and more (additional measurement items can be programmed as needed).
Temperature Control and Modes: The temperature-controlled refractometer offers four measurement modes: continuous mode (updated every 2 seconds), single scan mode (initiated after stabilization), automatic printing mode, and stable mode (based on user-defined fluctuation range for improved accuracy).
User-Friendly Data Input: Users can opt for keyboard or numeric keyboard input. When printing, the refractometer sends the instrument's time, date, and serial code along with the print data to the printer.
Advanced Data Analysis: The refractometer allows users to set upper and lower alarm limits, calculate average values, read standard deviations, and view real-time data curves.

Proper Usage of a Refractometer
Initial Calibration: Before commencing measurements, verify the readings using distilled water or a standard sample. To use a standard sample, apply 1-2 drops of bromonaphthalene to the polished prism surface and affix it to the refractive prism. Ensure that the reading field of view matches the value on the standard sample, and check if the boundary image aligns with the center of the reticle. If not, gently adjust the animal lens using a screwdriver until the image aligns correctly. This minimizes initial errors, including operator aiming errors.
Calibration and Consistency: Once calibrated, refrain from moving this part during subsequent measurements. Routine measurement typically does not require instrument recalibration. If any doubts arise about the refractive index indication, check for initial errors and correct them.
Regular Maintenance: Before each measurement and calibration, gently clean the rough surface of the incident prism, the polished surface of the refractive prism, the polished surface of the standard sample (1:1), and absorbent cotton with anhydrous ethanol mixture. This prevents the presence of contaminants that could affect imaging clarity and measurement precision.
Refractometer Maintenance
Storage: Store the instrument in a dry and well-ventilated room to prevent mold growth on optical components caused by humidity.
Cleaning: Promptly clean the instrument, including optical parts, metal components, and painted surfaces, when exposed to corrosive liquids. Always clean the instrument after use.
Sample Quality: Ensure that tested samples are free from hard impurities. When analyzing solid samples, take precautions to protect the refractive prism's surface from roughness or indentation.
Cleanliness: Maintain the refractometer's cleanliness by avoiding contact with greasy or sweaty hands. In case of dust on optical surfaces, gently wipe it with high-grade deerskin or long-fiber absorbent cotton, and blow it away using a gentle stream of air. For oil stains on optical components, promptly wipe them with alcohol.
Avoid Vibration: Prevent strong vibrations or shocks to the refractometer, as they can damage its components and compromise measurement accuracy.