In the realm of print marketing, maintaining color consistency is pivotal for success. Whether it's a logo on a business card or a vibrant brochure showcasing products, uniformity in color across printed materials is indispensable for brand identity, consumer trust, and overall visual appeal. In this piece, we'll delve into the significance of color consistency in printed materials, tackle the challenges associated with achieving it, and explore effective strategies for maintaining uniformity.

The Importance of Color Consistency in Printed Materials
1. Reinforcing Brand Identity
Recognition: Consistent colors are crucial for brand recognition. When consumers encounter consistent colors across different printed materials like business cards and brochures, they quickly associate those colors with the brand, reinforcing brand identity and recall.
Professionalism: Inconsistencies in color can detract from the professional appearance of printed materials. Maintaining color consistency conveys attention to detail and professionalism, enhancing brand credibility and trustworthiness.
2. Enhancing Communication
Message Clarity: Consistent colors ensure that the intended message of the printed material is accurately conveyed. Whether it's a call-to-action on a flyer or product information on a label, uniform colors make the content more legible and comprehensible, improving communication effectiveness.
Visual Cohesion: Uniform colors create visual harmony across different printed assets, enhancing the overall visual appeal of marketing materials and making them more engaging and memorable to the audience.
3. Improving Customer Experience
Consistency Expectation: In today’s competitive market, consumers expect consistency from brands across all touchpoints, including printed materials. Consistent colors instill confidence in consumers, signaling reliability and attention to detail, which positively impacts the overall customer experience.
Brand Trust: Inaccurate colors or inconsistencies in printed materials can undermine brand trust and perception. By ensuring color consistency, brands demonstrate their commitment to delivering high-quality products and services, fostering trust and loyalty among consumers.
4. Boosting Operational Efficiency
Streamlined Production: Color consistency streamlines the production process for print service providers. By establishing standardized color profiles and workflows, printers can minimize color adjustments and reprints, leading to greater efficiency and cost savings.
Reduced Waste: Consistent colors reduce the likelihood of color-related errors and rejections during the printing process, minimizing waste of materials, time, and resources and contributing to a more sustainable printing operation.
Challenges in Achieving Color Consistency in Printed Materials
Achieving color consistency in printed materials is a multifaceted process fraught with challenges stemming from technical and environmental factors.
1. Printer Variation
Hardware Differences: Even printers of the same model may produce slight variations in color output due to differences in hardware components.
Calibration Discrepancies: Inconsistent calibration settings among printers can lead to variations in color reproduction.
2. Substrate Influence
Paper Type and Texture: Different types of paper absorb ink differently, leading to variations in color appearance.
Ink Absorption: Highly absorbent substrates may cause inks to spread and blend, resulting in less vibrant colors and reduced accuracy.
3. Environmental Factors
Temperature and Humidity: Fluctuations in environmental conditions can impact color perception and print quality.
Lighting Conditions: Inconsistent lighting sources may alter color appearance and visibility.
4. Ink and Color Management
Ink Formulation: Variations in ink formulation can impact color consistency.
Color Management Practices: Inadequate color management practices can lead to discrepancies and inaccuracies.
5. Human Error
Manual Color Adjustments: Human intervention in color adjustments can introduce errors.
Communication Challenges: Miscommunication regarding color expectations can lead to discrepancies in color reproduction.

Effective Strategies for Achieving Color Consistency in Printed Materials
Achieving color consistency requires a systematic approach that addresses technical, environmental, and operational factors.
1. Standardized Color Management System
Color Profiling: Use management software to create accurate color profiles and calibrate devices regularly.
Color Standards: Adhere to industry-standard color spaces for consistency.
Device Calibration: Regularly calibrate printing devices for accurate reproduction.
2. Quality Control Procedures
Color Verification: Conduct checks throughout the printing process using visual printing inspection machine and compare samples against reference standards.
Test Prints: Evaluate color accuracy before full production.

3. Substrate Selection and Preparation
Consistent Substrates: Use uniform substrates to minimize variations in color appearance.
Pre-Press Treatment: Prepare substrates properly before printing.
4. Environmental Control
Stable Environment: Maintain stable conditions in the printing facility.
Lighting Considerations: Use consistent lighting sources to ensure accurate color perception.
5. Color Communication and Collaboration
Clear Communication: Establish clear channels and provide detailed specifications.
Collaborative Approaches: Foster collaboration between stakeholders.
6. Continuous Improvement
Feedback Mechanisms: Solicit feedback and implement corrective actions.
Training and Education: Provide ongoing training on best practices.
Conclusion
Color consistency in printed materials is fundamental for brand identity and professionalism. By prioritizing color management and implementing standardized procedures, printers can ensure accurate reproduction, thereby fostering trust and visual harmony, ultimately driving success in print marketing.
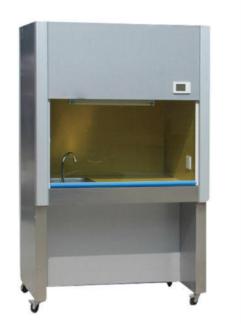
Fume hoods are indispensable pieces of equipment in laboratory settings, providing crucial protection for researchers and lab personnel against hazardous gases, vapors, and airborne particles. These enclosed workspaces play a pivotal role in maintaining a safe and controlled environment when handling chemicals, volatile compounds, or biological agents. In this article, we delve into the workings of fume hoods, shedding light on their operational principles and processes aimed at ensuring the health and well-being of laboratory workers.
Fundamental Operational Principle of Fume Hoods
At its core, a fume hood operates by capturing, containing, and expelling dangerous airborne substances away from the user. By regulating airflow, fume hoods effectively prevent the dispersion of hazardous compounds into the laboratory environment, thereby minimizing the risk of exposure.
The Working Process of Fume Hoods
To facilitate the safe handling of hazardous materials, fume hoods employ a combination of containment mechanisms, airflow regulation, and exhaust systems.
Containment:
Fume hoods are constructed as enclosed spaces where hazardous compounds are managed. They typically feature a box-like structure with sides, a rear panel, and a front opening covered by a sash. The sash can be raised or lowered to control access to the workspace. Internally, fume hoods are lined with chemical-resistant materials to prevent corrosion and facilitate easy cleaning.
Airflow Regulation:
Critical to maintaining a controlled atmosphere within the workspace is the airflow control system integrated into fume hoods. This system comprises an exhaust fan, ductwork, and filters.
Exhaust Fan: Generating negative pressure within the fume hood, the exhaust fan draws air and pollutants towards the exhaust system.
Ductwork: Fume hoods are connected to either the building's exterior or a designated ventilation system through ductwork, which facilitates the removal of contaminated air from the laboratory.
Filters: Often incorporated into exhaust systems, filters remove impurities from the air before its release into the environment. Common filter types include activated carbon filters for chemical adsorption and HEPA filters for particulate filtration.
Airflow Patterns:
When the exhaust fan is activated, it creates negative pressure within the fume hood. This negative pressure draws air from the laboratory into the fume hood through the front opening, before expelling it out through the rear.
Capture Velocity:
The capture velocity refers to the controlled rate at which air is drawn into the fume hood to capture and contain harmful chemicals. This velocity is adjusted based on the types of compounds being handled and specific laboratory requirements.
Baffles:
Strategically positioned within the fume hood, baffles disrupt the straight-line airflow, creating turbulence. This turbulence facilitates the mixing and dilution of hazardous compounds, aiding in their collection and containment.
Exhaust System:
Following containment and dilution, the exhaust fan evacuates the trapped pollutants and air from the fume hood. Linked to a ducting system, the exhaust fan transports contaminated air either outside the building or into a designated ventilation system. Before release, exhaust air may undergo filtration to remove residual impurities.
Sash Positioning:
The positioning of the sash plays a crucial role in maintaining fume hood functionality. By adjusting the sash height, users can manage airflow and maintain the desired capture velocity, ensuring an effective barrier between themselves and hazardous substances.
Safety Measures:
Modern fume hoods often incorporate monitoring and safety features to optimize performance and ensure human safety. These may include airflow sensors to maintain required capture velocities, alarms to signal low airflow or malfunctions, and indicators to monitor filter saturation or system status.
In Summary
Fume hoods serve as indispensable safeguards in laboratory environments, shielding personnel from potentially harmful gases, vapors, and particles. Through the integration of airflow control, containment mechanisms, and exhaust systems, fume hoods effectively capture, contain, and eliminate airborne contaminants. Understanding the operational principles of fume hoods is crucial for their correct usage, maintenance, and adherence to safety protocols, thereby fostering a secure and controlled atmosphere for scientific research and experimentation.
Rivet nuts, also referred to as threaded inserts or blind rivet nuts, are invaluable fasteners utilized for establishing robust and dependable threads in materials where traditional threading techniques prove impractical. Whether initiating or dismantling rivet nuts, mastering the proper methodologies and precautions is paramount for achieving favorable results. This guide will comprehensively explore the procedures for installing and uninstalling rivet nuts, equipping you with the knowledge needed to proficiently execute these tasks.

Installing Rivet Nuts
Necessary Tools and Materials:
Before commencing the installation process, ensure you have the essential tools and materials readily available, including a drill, an appropriate rivet nut installation tool (such as a hand or power tool), drill bits of suitable sizes, and the rivet nuts themselves.
Pre-Installation Preparations:
To facilitate a seamless installation process, undertake the following preparatory measures:
Selecting the rivet nut with the right size and type: Factor in the material thickness, load requirements, and thread size to select the suitable rivet nut.
Marking the Installation Spot: Accurately mark the intended installation location to ensure precise placement.
Installation Steps:
Follow these steps for successful rivet nut installation:
Drilling a Hole in the Base Material: Utilize a drill with a bit slightly smaller than the outer diameter of the rivet nut to create a hole in the base material.
Inserting the Rivet Nut into the Hole: Ensure the rivet nut is inserted into the drilled hole, positioned flush with the material surface.
Applying Pressure to Expand the Rivet Nut: Utilize the appropriate installation tool to exert pressure, causing the rivet nut to expand and securely grip the surrounding material.
Verifying Proper Installation: Confirm that the rivet nut is firmly in place and capable of accommodating the intended fastener.

Uninstalling Rivet Nuts
Necessary Tools and Materials:
Before proceeding with rivet nut removal, gather the following tools and materials: a rivet nut removal tool (such as a mandrel and nosepiece set), pliers or wrenches, and safety gear.
Pre-Uninstallation Preparations:
Before initiating the removal process, undertake the following preparatory steps:
Identifying the Rivet Nut Type and Size: Determine the specific type and size of the rivet nut to select the appropriate removal tool and technique.
Inspecting Surrounding Components: Assess the surrounding components to ensure they remain undamaged during the uninstallation process.
Uninstallation Steps:
Follow these steps to remove a rivet nut:
Removing Connected Fasteners: If any fasteners are threaded into the rivet nut, remove them using pliers or wrenches.
Applying Reverse Force: Utilize the rivet nut removal tool to apply reverse force, breaking the nut’s grip on the base material.
Extracting the Rivet Nut: Once the grip is loosened, gently extract the rivet nut from the hole using pliers or the removal tool.
Post-Uninstallation Considerations:
After removing the rivet nut, address the following considerations:
Inspecting the Hole for Damage: Assess the hole to ensure it remains intact and free from any damage incurred during the removal process.
Repairing or Replacing the Hole: If necessary, repair the damaged hole using appropriate methods or consider replacing the entire component.
Common Challenges and Tips
Overcoming Resistance: If encountering resistance during either process, apply gentle pressure and ensure correct tool usage to avoid damage.
Dealing with Damaged Rivet Nuts: In cases of damage, consider specialized extraction tools or techniques for removal and explore alternatives for reinstallation.
Ensuring Proper Alignment and Torque: Ensure proper alignment and torque application during installation to prevent thread deformation or failure.
Using Lubricants or Adhesives: Lubricants or adhesives may aid in smoother installation or removal processes by reducing friction or enhancing stability.
Safety Considerations:
Wear appropriate personal protective equipment to mitigate potential injuries from flying debris or accidental slips.
Exercise caution during drilling and force application to prevent injuries or damage.
Take precautions to avoid damage to surrounding components or structures during installation or removal.
Conclusion:
Proficiency in rivet nut installation and removal is essential for various applications. By adhering to the outlined procedures, considering provided tips, and prioritizing safety measures, you can achieve successful outcomes while ensuring safety and efficiency. With this comprehensive guide, you are equipped to undertake rivet nut projects confidently, ensuring reliable and durable fastenings or removals.
Oil rigs are not solely confined to offshore locations; they also operate on land across various regions globally, delving deep into the Earth's crust to extract valuable fossil fuels. This article explores the world of land-based oil rigs, examining their operations and technological advancements aimed at enhancing efficiency in oil drilling.

Understanding Land-Based Oil Rigs
Land-based oil rigs are structures designed to extract crude oil and natural gas from beneath the Earth's surface. Unlike their offshore counterparts, land-based rigs differ significantly in design, operation, and environmental impact.
Key Components of Land-Based Oil Rigs
1. Derrick:
The towering derrick provides structural support for drilling equipment and serves as a guide for drilling components.
2. Drilling Rig:
Oil drilling rig houses the equipment necessary for drilling operations, including the drilling bit, mud system, and power units.
3. Mud Pumps:
Essential for circulating drilling mud—a mixture of water, clay, and chemicals—to cool the drill bit, lubricate the drill string, and remove cuttings.
4. Mud Tanks:
These tanks store drilling mud, facilitating its recirculation during the drilling process.
5. Wellhead:
Serving as the endpoint of the wellbore, the wellhead ensures a secure seal to prevent oil and gas leaks into the environment.

Operational Processes of Land-Based Oil Rigs
1. Site Preparation:
The process begins with selecting a suitable drilling location, involving geologic surveys and obtaining permits.
2. Drilling:
Once the rig is in place, drilling commences, with the drilling bit rotating to create a borehole thousands of feet deep. Continuous pumping of drilling mud maintains borehole integrity.
3. Casing Installation:
Steel casing pipes are inserted into the borehole to prevent collapse, isolate geological formations, and protect groundwater.
4. Well Completion:
After reaching the desired depth, the well is completed by installing cement between the casing and surrounding rock to create a secure seal.
5. Production:
Productive wells bring oil and gas to the surface using pumps, which are then transported for refining and distribution.
Technological Innovations for Land-Based Oil Rigs
Technological advancements have greatly enhanced the efficiency, safety, and sustainability of land-based oil drilling operations. These innovations include:
1. Automation and Remote Monitoring:
Automated drilling systems and remote monitoring enable optimization of drilling parameters and real-time operational adjustments.
2. Digital Twin Technology:
Drilling digital twin models aid operators in visualizing and simulating drilling rig performances, facilitating optimization and issue recognition.
3. Directional and Extended Reach Drilling:
Advances in drilling techniques allow exploration of previously inaccessible oil resources.
4. Electrification and Hybrid Power Systems:
Transitioning to electrified or hybrid power systems minimizes pollutants, reduces operational costs, and improves energy efficiency.
5. High-Performance Drilling Equipment:
Cutting-edge drill bits, motors, and downhole tools enhance drilling speed, accuracy, and reliability.
6. Drilling Fluid and Cuttings Management:
Environmentally friendly drilling fluids lessen the environmental impact of drilling operations.
7. Underbalanced Drilling:
Maintaining reservoir pressure during drilling enhances safety and reservoir recovery rates.
8. Advanced Sensors and Data Analytics:
Real-time data and analytics optimize drilling processes and equipment maintenance.
9. Modular Rig Designs:
Modular designs enable quicker setup and dismantling, reducing downtime and costs.
10. Renewable Energy Integration:
Integrating solar and wind power reduces carbon footprints and operational costs.
11. Drone Technology:
Drones improve efficiency and safety through aerial surveys, monitoring, and inspections.
12. Wellbore Imaging Tools:
Advanced imaging systems provide real-time subsurface data for improved drilling trajectories.
13. Advanced Cementing and Wellbore Isolation:
Innovations in cementing technology enhance wellbore integrity and minimize leakage risks.
14. Hydraulic Fracturing Technologies:
Multi-stage fracking and micro-seismic monitoring improve oil and gas recovery from unconventional sources.
Conclusion
Land-based oil rigs play a crucial role in the global energy sector, extracting fossil fuels vital for modern society. While offering economic benefits and energy security, these operations also pose environmental challenges. Technological innovations are essential for meeting energy demands while addressing environmental concerns, ensuring a sustainable future for the oil and gas industry.
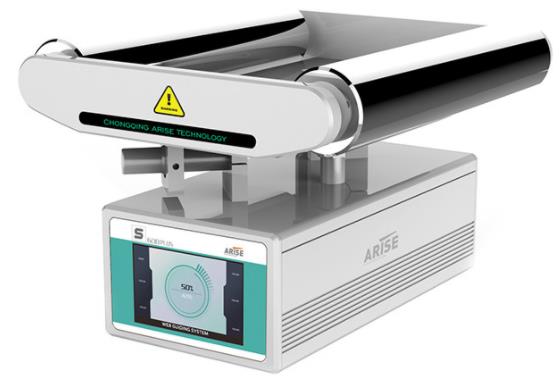
The integration of vision systems into traditional web guiding processes marks a substantial advancement in precision manufacturing. Unlike conventional methods relying on mechanical sensors or manual adjustments, vision systems offer improved accuracy and flexibility, essential for modern production operations. By incorporating cameras and image processing algorithms, these systems provide real-time monitoring and adaptive control capabilities, significantly enhancing precision and efficiency. This article explores the integration of vision systems in web guiding, shedding light on their transformative impact across various industries.

The Role of Vision Systems in Web Guiding
Vision systems, comprising cameras and image processing algorithms, excel at capturing and analyzing visual information in real-time. By continuously monitoring the location and alignment of web content, they offer precise input to guiding mechanisms, facilitating dynamic adjustments to maintain proper alignment. Unlike mechanical sensors prone to limitations or wear, vision systems boast greater flexibility and accuracy, making them indispensable for applications demanding precise alignment.
Key Benefits of Integrating Vision Systems in Web Guiding Processes
Precision:
Vision systems provide high-resolution imaging and advanced algorithms for accurate alignment identification and analysis. By precisely tracking the location and orientation of web material, they minimize misalignment-related faults, ensuring high-quality output.
Real-time Monitoring:
Continuous monitoring of web content position and movement enables immediate identification of deviations or abnormalities, allowing swift corrective action to maintain synchronization. Real-time monitoring reduces material waste and minimizes manufacturing errors.
Adaptive Control:
Vision systems facilitate adaptive control of guiding mechanisms based on real-time feedback. By dynamically adjusting parameters like speed, angle, or tension, they respond to changes in material properties or production conditions, ensuring consistent alignment and performance.
Versatility:
Vision systems can be tailored to accommodate various web materials and production processes. Adaptable and easily integrated, they offer versatility across industries, making them suitable for diverse applications.
Reduced Downtime:
Early detection of alignment issues or defects minimizes downtime associated with manual inspection. Vision systems enable timely interventions and preventive maintenance, mitigating the risk of production stoppages and equipment damage.
Data Insights:
Capturing valuable data on material alignment trends and production parameters, vision systems facilitate process optimization and quality control. Insights gained enable continuous improvement of web guiding processes and production efficiency.
Improved Safety:
Vision web guide systems reduce manual intervention, minimizing the risk of accidents associated with handling materials or machinery. By automating the guiding process, they contribute to a safer working environment for operators and maintenance personnel.
Future Trends and Innovations of Vision Systems in Web Guiding Processes
Enhanced Artificial Intelligence (AI) Integration:
Advanced AI techniques will enhance vision systems' capabilities, enabling them to evaluate vast amounts of visual data in real-time and autonomously modify guiding parameters for increased precision and effectiveness.
Multi-Spectral Imaging:
Integration of multi-spectral imaging will enhance material characterization and defect detection, particularly in applications with diverse materials and surface properties.
3D Vision and Depth Sensing:
Incorporating 3D vision and depth sensing technologies will enable more accurate detection of surface irregularities and enhance defect detection capabilities.
Edge Computing and Real-Time Processing:
Leveraging edge computing will enable faster response times and more efficient processing of visual data, enhancing system responsiveness and adaptability.
Integration with Robotics and Automation:
Integration with robotics will enable autonomous web guiding in dynamic production environments, enhancing efficiency and productivity.
Augmented Reality (AR) Interfaces:
AR interfaces will provide operators with user-friendly tools for managing web guiding procedures, improving user interaction and situational awareness.
Sustainability and Energy Efficiency:
Vision systems will prioritize eco-friendly materials and energy-efficient design, promoting sustainable manufacturing practices and waste reduction.
Conclusion
The integration of vision systems into web guiding processes represents a significant advancement in precision manufacturing. Across industries, these systems revolutionize production processes, enabling manufacturers to achieve higher quality, efficiency, and competitiveness. With ongoing advancements and innovations, vision-guided web guiding systems are poised to play a pivotal role in shaping the future of manufacturing.