Injection molding is a transformative manufacturing technique that has revolutionized the production of plastic and polymer-based products. It offers unparalleled efficiency, precision, and scalability, making it an indispensable method across various industries. This article delves into the workings of injection molding, detailing its process and the essential equipment used.

What is Injection Molding?
Injection molding is a manufacturing process in which molten material, typically thermoplastic or thermosetting polymers, is injected into a mold cavity. Once the material cools and solidifies, it takes on the shape of the mold. This highly adaptable technology can produce intricate and detailed parts with exceptional dimensional accuracy.
The Injection Molding Process
The injection molding process involves several stages that work together to convert raw materials into finished plastic or polymer products. These stages include mold preparation, material selection and melting, injection of molten material, cooling and solidification, mold opening and ejection, post-processing, and recycling.
1. Mold Preparation and Clamping
The first step involves preparing the mold, which is typically made of hardened steel or aluminum and consists of two halves: the cavity and the core. These halves fit together to form the desired shape of the final product.
Once prepared, the mold is placed in the injection molding machine. The clamping unit secures the mold, applying high pressure to keep it tightly closed during the injection process.
2. Material Selection and Melting
Next, the appropriate material for the product is selected. Thermoplastic polymers like polyethylene, polypropylene, and polystyrene are commonly used due to their ability to melt and solidify repeatedly.
The material, in pellet or granule form, is placed in a hopper on top of the injection molding machine. It then gravity-feeds into a heated barrel.
Inside the barrel, a rotating screw or plunger pushes the material forward into the heating zone. As the material moves, it melts due to the barrel's heating elements.
3. Injection of the Molten Material
Once the material reaches the desired temperature and melts, the injection phase begins. The screw or plunger moves forward, injecting the molten material into the mold cavity through a nozzle. This injection is precisely controlled to ensure the entire cavity is filled.
The material flows into the mold under high pressure, conforming to the cavity’s shape and capturing the details and features of the final product.
4. Cooling and Solidification
After the cavity is filled, the molten material starts to cool and harden. Cooling channels within the mold circulate a coolant, usually water or oil, to rapidly remove heat from the material.
This cooling process is critical for maintaining dimensional stability and optimal part quality. It dictates the solidification rate and, consequently, the cycle time of the injection molding process. Cooling time varies based on the material and part design.
5. Mold Opening and Ejection
Once the material solidifies, the clamping unit opens the mold. Ejector pins or plates push the part out of the mold cavity. This ejection mechanism ensures the part is removed smoothly without damage.
The ejected part is separated from the runner system, which is the channel that transported the molten material to the cavity. Trimming or cutting is typically used to remove the runner system.
6. Post-Processing and Quality Control
Post-processing steps may be required to achieve the desired final product specifications. These steps can include trimming excess material, applying surface treatments, assembling multiple parts, and conducting quality inspections.
Quality control techniques such as dimensional checks, visual inspections, and functional testing ensure the finished product meets required standards.
7. Recycling and Material Reuse
Waste material, including runners and rejected parts, can be collected and recycled within the injection molding process. Recycling minimizes material waste and supports sustainability initiatives.
Equipment Involved in Injection Molding
Efficient injection molding requires several critical pieces of equipment:

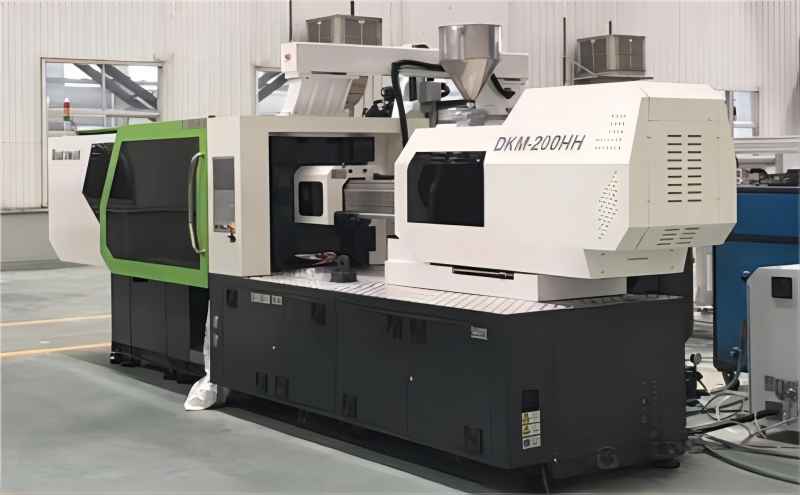
Injection Molding Machine
The heart of the process is the injection molding machine, also known as an injection molding press. It comprises several components:
Hopper: Holds raw material in pellet or granule form, feeding it into the machine by gravity.
Barrel and Screw/Plunger: The barrel is a heating chamber that melts the raw material. Inside, a rotating screw or reciprocating plunger drives the material forward and homogenizes it as it melts. The screw/plunger also applies pressure to inject the molten material into the mold.
Heating Unit: Heats the barrel to melt the material, requiring precise temperature control for consistent melt consistency.
Clamping Unit: Holds the mold in place during injection, applying significant force to keep mold halves tightly closed and prevent leaks.
Control System: Advanced controls manage temperature, pressure, injection speed, and other parameters to ensure precise and consistent production.
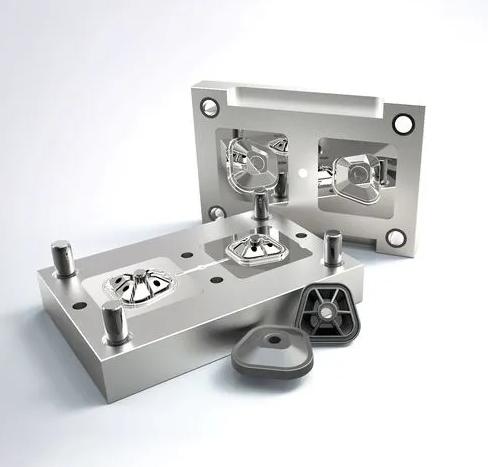
Mold
The mold, also known as the tool or die, defines the shape, size, and features of the final product. It consists of two halves: the cavity and the core, often made of hardened steel or aluminum alloy to withstand high pressures and temperatures. Cooling channels within the mold help regulate its temperature and aid in material solidification.
Material Feed System
This system transports raw material from the hopper to the machine’s barrel and includes:
Hopper: Stores and feeds raw material into the machine.
Feeding Mechanism: Usually a screw or plunger, this mechanism ensures consistent material flow into the heating barrel for melting and injection.
Cooling System
Cooling channels within the mold ensure proper cooling and solidification of the molded item by circulating a coolant, such as water or oil. This system helps maintain dimensional stability and reduces cycle time.
Auxiliary Equipment
Additional equipment may include:
Granulators or Shredders: Crush scrap material or rejected parts into pellets or granules for recycling within the injection molding process.
Dryers: Remove moisture from raw materials before processing to improve quality and reduce defects.
Mold Temperature Controllers: Regulate the temperature of the mold’s cooling channels for precise and consistent cooling, enhancing part quality and reducing cycle time.
Material Handling Equipment: Conveyors or robots to transport molded parts from the machine to post-processing or packaging stations.

Conclusion
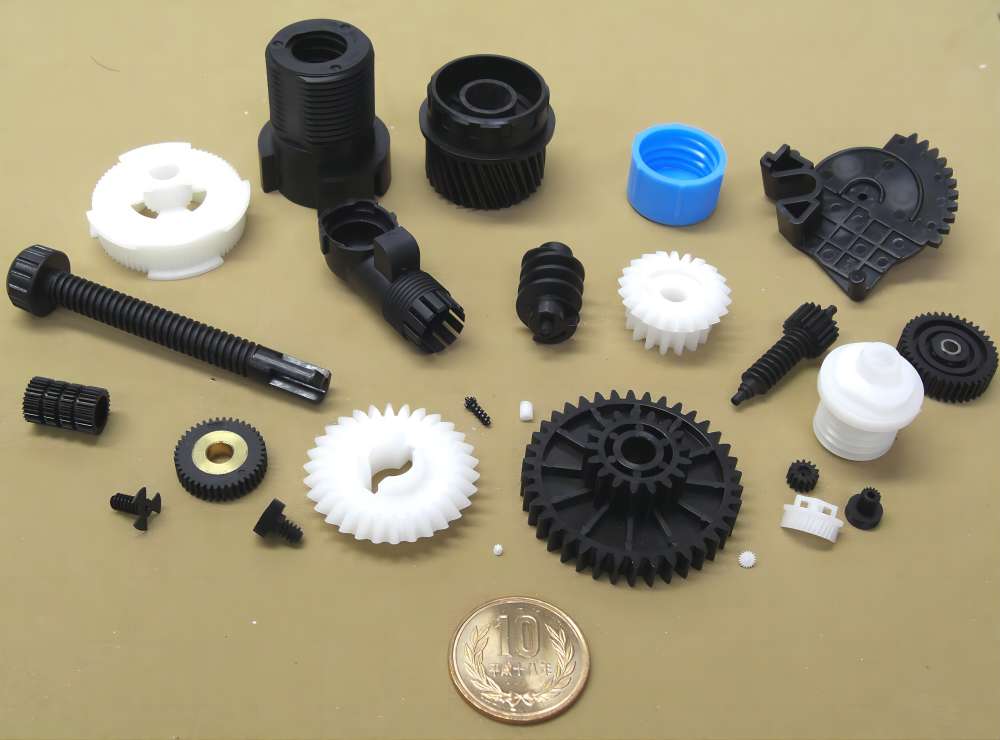
Injection molding is a versatile and highly efficient manufacturing process that has revolutionized the production of plastic and polymer-based products. Its capability to create injection molding parts with complex shapes and high dimensional accuracy and scalability makes it indispensable across various industries. By understanding its working process and equipment, manufacturers can optimize production and ensure high-quality output.
Injection molding is a widely used manufacturing process known for its ability to produce plastic parts with high precision and efficiency. However, like any manufacturing process, it can encounter certain defects that impact the quality and functionality of the final products. Understanding these common defects and implementing preventive measures is crucial for ensuring successful and cost-effective production. This article explores some of the most common defects in injection molding and discusses strategies to prevent them, enabling manufacturers to achieve high-quality, defect-free parts.
Common Defects in Injection Molding and Prevention Strategies
Defects in injection molding can arise from various factors during the manufacturing process. Here are some of the most common defects and potential prevention measures:
Sink Marks
Description: Sink marks are depressions or indentations on the surface of the molded part caused by localized shrinkage during cooling.
Prevention Measures:
Design considerations such as ensuring adequate wall thickness.
Proper gate placement to control the flow of the molten material.
Optimization of cooling channels to ensure uniform cooling and minimize differential shrinkage.
Warping
Description: Warping refers to the deformation or twisting of a part after it has been molded.
Prevention Measures:
Maintain uniform cooling throughout the part.
Minimize internal stresses by optimizing the cooling system design and gate locations.
Use materials with lower shrinkage properties to reduce the likelihood of warping.
Flash
Description: Flash occurs when excessive material flows into the mold cavity and escapes through the mold parting line.
Prevention Measures:
Ensure proper mold design to prevent material overflow.
Apply accurate clamping force to keep the mold tightly closed.
Precisely control injection pressure and speed to prevent excess material flow.
Regularly inspect and maintain molds to ensure they remain in good condition.
Short Shot
Description: A short shot happens when the mold cavity is not completely filled with molten plastic, resulting in incomplete parts.
Prevention Measures:
Optimize injection parameters such as temperature, pressure, and cycle time.
Ensure adequate venting to allow air to escape and enable complete filling.
Maintain proper melt viscosity and avoid excessive cooling of the melt.
Weld Lines
Description: Weld lines are lines or marks on a part where two or more flow fronts meet during the injection molding process, potentially weakening the part’s structural integrity.
Prevention Measures:
Optimize gate placement and mold design to ensure a smooth and consistent flow of the molten material, reducing the likelihood of weld lines.
Burn Marks
Description: Burn marks are discolored or burnt areas on the surface of a part caused by excessive heat or degradation of the plastic material.
Prevention Measures:
Control melt temperature, injection speed, and cycle time to prevent overheating.
Ensure proper venting to release trapped gases.
Use materials with higher heat resistance to withstand the injection process without degrading.

Air Traps/Bubbles
Description: Air traps or bubbles occur when air is trapped within the mold cavity during injection, resulting in voids or air pockets in the part.
Prevention Measures:
Ensure adequate venting to allow air to escape during the injection process.
Maintain proper injection pressure to ensure complete filling of the mold cavity.
Use appropriate injection and packing profiles to prevent air entrapment.
Summary
These are just a few examples of common defects in injection molding and their corresponding preventive measures. Each defect may have multiple causes, so it’s important to analyze specific molding parameters, material properties, and design aspects to identify root causes and implement appropriate solutions. Regular monitoring, process optimization, and continuous improvement are essential for minimizing defects and achieving high-quality injection molded parts. By understanding and addressing these common issues, manufacturers can enhance the efficiency and reliability of their injection molding processes, leading to better product quality and reduced production costs.
Plastic injection molding has transformed the manufacturing industry by enabling the production of complex and precise plastic components used across various sectors. This article explores 9 major plastic injection molding technologies, highlighting their distinctive characteristics, applications, and benefits. By understanding these techniques, injection molding manufacturers can enhance product quality, optimize production processes, and achieve cost-effectiveness.

Gas-Assisted Injection Molding (GAIM)
Gas-Assisted Injection Molding (GAIM) employs high-pressure inert gas to assist in the molding process. By injecting gas when the plastic is 90% to 99% filled, the gas propels the molten plastic to fill the remaining mold cavities. This technology offers several advantages:
Reduced residual stress and warping
Elimination of sink marks
Decreased mold locking force
Material savings
Shortened production cycle time
Extended mold life
Reduced machine wear
GAIM is ideal for products with significant thickness variations, such as tubular and rod-shaped items, and complex parts with varying thicknesses.
Water-Assisted Injection Molding (WAIM)
Water-Assisted Injection Molding (WAIM) is based on GAIM but uses water instead of inert gas. Water's higher thermal conductivity and heat capacity result in shorter cooling times and reduced cycle times. Additionally, water is cost-effective and recyclable. WAIM provides:
Uniform wall thickness
Prevention of finger effects
Smooth inner surfaces
WAIM is particularly effective for producing hollow or tubular parts with consistent wall thickness.
Precision Injection Molding
Precision Injection Molding produces high-quality plastic components with stringent requirements for dimensional accuracy, surface quality, and internal consistency. Key features include:
Dimensional tolerances as low as 0.01mm
Excellent repeatability of part weight
High-quality mold materials
Precise temperature control
Optimized molding cycles
Advanced injection molding machines
This plastic injection molding technique is extensively used in manufacturing components for computers, smartphones, optical discs, and other microelectronic devices requiring exceptional quality and precision.

Micro Injection Molding
Micro Injection Molding is used to produce extremely small plastic parts. It requires precise control of process parameters like metering, temperature, and pressure. Key benefits include:
High precision with measurement accuracy down to milligrams
Temperature control within ±0.5°C for the barrel and nozzle
Mold temperature control within ±0.2°C
Stable part quality
High production efficiency
Low manufacturing costs
Ease of batch production and automation
Micro injection molding is widely used in micro-pumps, valves, micro-optical devices, biomedical instruments, and microelectronic products.
Microcellular Injection Molding
Microcellular Injection Molding, also known as foam injection molding, introduces a foaming agent into the molten plastic to create closed-cell microfoam structures. Advantages include:
Significant weight reduction
Shorter cycle times
Reduced clamp force requirements
Low internal stress and warpage
High dimensional stability
Large molding windows
This technology is crucial for producing high-precision and costly products, enhancing the overall efficiency and quality of the manufacturing process.
Vibration Injection Molding
Vibration Injection Molding applies a vibration field during the molding process to control the polymer’s condensed structure, improving the mechanical properties of the molded parts. Benefits include:
Enhanced mechanical properties (strength, stiffness, impact resistance)
Reduced molding defects (sink marks, voids, warpage)
Higher productivity and cost savings
This technique is particularly beneficial for parts requiring high structural integrity, such as automotive components, electrical enclosures, and consumer electronics.
Multi-Component Injection Molding
Multi-Component Injection Molding, or two-shot/multi-shot molding, produces complex parts with different materials or colors in a single cycle. Advantages include:
Reduced assembly steps
Improved part consistency
Enhanced design flexibility
Minimized material waste
Overall cost savings
This technique is used in the automotive industry for multi-color interior trim components, medical devices with integrated seals, and consumer products with soft-touch grips.

Insert Injection Molding
Insert Injection Molding involves placing metal or plastic inserts into the mold cavity before injecting molten plastic. Benefits include:
Enhanced strength
Improved heat resistance
Increased design possibilities
It is widely used in producing electrical connectors, automotive components, and medical devices where metal inserts are required for added durability and stability.
Co-Injection Molding
Co-Injection Molding, also known as sandwich molding or multi-material injection molding, injects multiple materials simultaneously to create a composite structure. Advantages include:
Reduced material costs
Improved part performance
Enhanced design possibilities
Simplified manufacturing processes
This technique is applied in producing packaging materials, consumer goods, and automotive components.
Conclusion
The 9 major plastic injection molding technologies discussed above have revolutionized the manufacturing industry, offering a wide range of capabilities to produce complex, precise, and high-quality plastic components. Each technique has unique features, applications, and benefits, enabling manufacturers to optimize their production processes, enhance product performance, and achieve cost-effectiveness. Understanding these technologies allows injection molding manufacturers to leverage their strengths to meet the increasing demands for innovative and reliable plastic products across various industries. As the field of plastic injection molding continues to advance, further technological advancements are expected, leading to even more exciting possibilities and opportunities for manufacturers in the future.
Injection molding stands as a prevalent manufacturing process renowned for its ability to fabricate intricate and precise structures by injecting molten plastic into a mold cavity. This method deposits polymer into a mold where it cools and solidifies, culminating in the production of the final item. The injection molding technique bears significant influence on the quality of the end product.
Material Selection in Injection Molding
Selecting the appropriate material for injection molding is paramount to attaining a high-quality end result. Materials with a higher melt flow index (MFI) or viscosity often yield superior part quality, while those with a lower MFI or viscosity may lead to defects such as warping, sink marks, or flash. The MFI denotes the rate at which a material flows through the mold, thus opting for a material with a high MFI ensures thorough and consistent mold filling.
Temperature Control in Injection Molding
Temperature regulation of the molten plastic holds paramount importance in the injection molding process. Excessive temperatures can cause plastic degradation, resulting in flaws such as discoloration or bubble formation. Conversely, insufficient temperatures may lead to uneven plastic flow, resulting in incomplete mold filling or voids in the finished product. The appropriate temperature range is typically specified by the material supplier, emphasizing the necessity of injecting plastic at the prescribed temperature.
Pressure Management in Injection Molding
Injection pressure plays a pivotal role in determining the quality of the final product. High-pressure injection often yields superior component quality and surface finish, while low-pressure injection may result in incomplete mold filling, voids, or sink marks. The injection pressure is contingent upon the size, intricacy of the item, and the properties of the plastic utilized.
Cooling Dynamics in Injection Molding
The cooling rate of the plastic post-injection significantly impacts the final product's quality. Gradual cooling may result in warping or other defects, whereas rapid cooling can enhance product quality and reduce errors. Mold design and the arrangement of cooling channels within it often dictate the cooling rate, necessitating consistent cooling throughout the part to mitigate stress-induced defects.
Mold Design Considerations
Well-designed molds facilitate even filling and prevent faults such as sink marks and warping. Mold design is influenced by factors like the component's size, intricacy, and the plastic's properties. It's imperative to construct molds accounting for plastic shrinkage during cooling and solidification.
Additional Factors Affecting Product Quality
Beyond the aforementioned aspects, various other factors can impact the final product's quality. Contaminants or impurities in the plastic, additives or fillers, injection speed, and duration are among these variables. Rigorous control of these factors is essential to ensure the production of high-quality, defect-free products.
Conclusion
The injection molding process significantly shapes the quality of the end product. Material selection, temperature control, pressure management, cooling dynamics, and mold design are all critical facets that demand meticulous attention to achieve high-quality, defect-free products.
Injection molding manufacturing process involves injecting molten plastic into a mold cavity to produce intricate and precise parts. Renowned for its capacity for high production rates, excellent repeatability, and ability to manufacture parts with complex geometries, injection molding offers numerous advantages. However, achieving optimal results requires careful consideration of various factors, including cycle time, shrinkage, and troubleshooting common issues that may arise during production.
Understanding Cycle Time:
Cycle time in injection molding refers to the duration required to complete one injection molding cycle, encompassing the injection of plastic material into the mold, cooling, and ejection of the finished part. This crucial parameter is influenced by several factors:
Part Complexity: Parts with intricate geometries or complex features may necessitate longer cycle times to ensure proper filling and cooling.
Material Type: Different plastic materials have distinct flow properties and cooling characteristics, impacting cycle times.
Mold Design: The mold's design and configuration, including the number of cavities and gating system, affect cycle time.
Machine Capability: The injection molding machine's specifications, such as injection speed and cooling capacity, influence cycle times.
Determining cycle time involves optimizing the injection molding process by adjusting parameters like temperature, pressure, and flow rate. Trial runs are typically conducted to identify the most efficient settings for achieving the desired cycle time while maintaining part quality.
Calculating Shrinkage Factor:
Shrinkage is the dimensional change that occurs in a part as it cools and solidifies after injection molding. Calculating the shrinkage factor is crucial for designing molds and predicting the final dimensions of the molded part. The process involves:
Measuring Part Dimensions: Measure the dimensions of the finished part using precision tools.
Determining Mold Dimensions: Measure the dimensions of the mold cavity.
Subtracting Dimensions: Calculate the difference between the part dimensions and the mold dimensions to determine shrinkage.
Calculating Shrinkage Factor: Divide the shrinkage by the original dimension to obtain the shrinkage factor.
Performing trials with different materials and processing conditions is essential to accurately determine the shrinkage factor for specific parts.
Troubleshooting Common Issues:
Injection molding may encounter various challenges during production, including warping, sinking, short shots, flashing, and jetting. Addressing these issues requires a systematic approach:
Identify Root Causes: Determine the underlying factors contributing to the problem, such as mold design, material properties, or processing parameters.
Adjust Parameters: Modify injection speed, pressure, temperature, or cooling time to optimize process conditions.
Enhance Mold Design: Improve mold venting, gate design, or part geometry to alleviate issues like flashing or short shots.
Implement Quality Control: Regularly monitor process parameters and inspect parts for defects to detect and address issues promptly.
By understanding these key aspects of injection molding and implementing effective strategies, manufacturers can produce high-quality parts that meet specifications, maximize efficiency, and minimize production costs. Consistent monitoring, analysis, and optimization of the injection molding process are essential for achieving success in this versatile manufacturing method.